RixPattern Plugins
Cutter


return to main index

Links:
    CutrBBones.args
    CutrBBones.cpp


Summary of Cutter's Features

    Fast authoring of .args documents.
    Browser preview of the UI defined by a .args document.
    Automatic CPP code generation.
    Automatic registraion of a .args nodeid.
    Writes and executes a makefile for compiling and building a pattern plugin.
    Quick access to the rix methods and standard coding chores.
    Header file lookup.
    Typing Completion.
    Pixar Docs.


Introduction

Version 19 of RMS and RPS introduced an advanced form of raytracing called RIS. RIS relies on the use of shading networks built from components written, not in RSL, but in C++. Pixar's documentation about the RIS API can be found here,

This tutorial demonstrates how Cutter can be used, by those who have a basic knowledge of the C/C++ programming languages, to implement a shading component called a RixPattern plugin.

If the reader has followed the instructions in the tutorial, "RfM Customizing" they will already have installed the same plugin that is outlined in this tutorial. However, for those who are new to writing a pattern plugin following the instructions on this page will still be a very useful exercise.

When used with Maya, RixPattern plugins form "down-stream" shading components that supply values to a material such as PxrDisney. For example, 
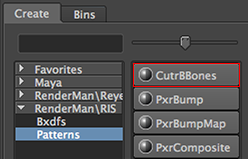
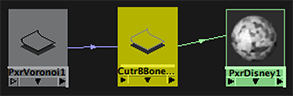
figure 1 shows a simple shading network consisting of two factory RixPattern plugins (PxrFbm and PxrTexture) and a custom plugin called CutrBBones.
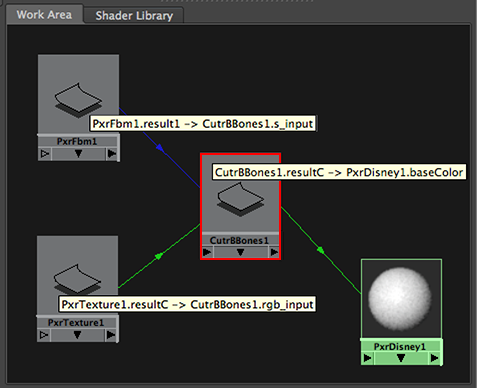

Figure 1
CutrBBones (plugin) node as part of a shading network.


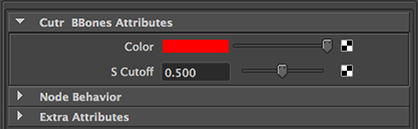
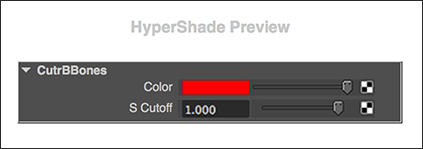
RixPattern plugins are implemented by two files - a text file and a DSO (dynamic shared object). A ".args" text document describes the inputs and outputs of a plugin. When a plugin is loaded by Maya's HyperShade its corresponding ".args" file is used to define the "look" of user interface. For example, part of the ".args" document for the CutrBBones plugin (figure 1) is shown below. It defines two inputs, "rgb_input" and "s_cutoff", and a single output named "resultC". The interface is shown in figure 2.


Listing 1 (CutrBBones.args)


<args format="1.0">
    <page name="Parameters" open="True">
        <param name="rgb_input" label="Color"  type="color"  default="1 0 0" [other code omitted]/>
        <param name="s_cutoff" label="S Cutoff" type="float"  default="0.5" [other code omitted]/>
    </page>
    <output name="resultC"  tag="color|vector|normal|point|pattern"/>
    [other code omitted]
</args>


Figure 2
CutrBBones UI in HyperShade.


Figure 3
"Out-of-the-box" coloration applied by CutrBBones.


Cutter & Writing Pattern Plugins

Writing a pattern plugin consists of using Cutter to create and add inputs and outputs to an ".args" file. After which, Cutter can be used to generate a ".cpp" file that will implement most of the (routine) code required by the RixPatter API. This tutorial demonstrates, step-by-step, how Cutter can be used to develop and test a simple RixPattern plugin named "CutrBBones". The plugin applies a color, figure 3, to an object where its surface exceeds a pre-defined 's' texture value. The full code for the ".args" and ".cpp" files are available here,
    CutrBBones.args
    CutrBBones.cpp

The tutorial also explains how a plugin is "registered" with RenderMan for Maya. For the purposes of this tutorial it is assumed the user has a Maya directory structure as explained in,
    RfM: Customizing
and has created a "RfM_ris" and a "Args" sub-directory within their maya/projects folder. For example.

    maya/projects/
                |_ RfM_ris/
                |       |_Args/
                |       |    |_ [pattern.args files are kept here]
                |       |
                |       |_ [pattern.cpp files are kept here]
                |
                |_ RfM_ini/
                |       |_ RenderMan_for_Maya.ini
                |       |_ RMSWorkspace.ini
                |       
                |_other RfM_xxx directories

Creating a RixPattern Plugin

Step 1 - Creating a .args file

Select the Templates->Args->cutrEmptyPattern.args menu item.


Figure 4

A basic .args document will open. Save it as,

    maya/projects/RfM_ris/Args/CutrBBones.args

Step 2 - Adding Inputs

Right-mouse click on the line immediately after the "Inputs begin" comment. From the popup menu choose,
    Params/Inputs->color->swatch and
    Params/Inputs->float->slider
figures 5 and 6.


Figure 5 - Adding a color parameter


Figure 6 - Adding a float parameter

Each param is identified by two strings, "name" and "label". The "label" string sets the title of the widget in HyperShade. However, the "name" string is more significant than the "label" because it must match an item in the C++ source code file of the plugin. Readers are strongly advised to think carefully about the value of the "name" string because changing it at a later date can be very tedious. Assign the following "name", "label" and "default" values to the inputs.


<param name="rgb_input" label="Color"  type="color"  default="1 0 0" input="True"  widget="color" tag="color and pattern"/>
<param name="s_cutoff" label="S Cutoff" type="float"  default="0.5"   input="True"  widget="default"/>


Step 3 - Adding an Output

Right-mouse click on the line immediately after the "Outputs begin" comment. From the popup menu choose "Results/Outputs->Color" - figure 7.


Figure 7 - Adding a color output

The output name resultRGB can be edited if you wish to use a more descriptive name.


Step 4 - Previewing the Interface in a Browser

To preview the ".args" interface use the keyboard shortcut alt+e (or control+e or apple+e). Cutter will write and display a web page that pre-visualizes the appearance of the plugin in HyperShade - figure 8.


Figure 8


The preferred browser can be set using the Preferences Tool (Edit->Show Preferences) - figure 9.


Figure 9


Step 5 - Generate the C++ Code

Right-mouse click anywhere within the CutrBBones.args document and select,
    Create C++ Pattern Code


Figure 10


Cutter will generate a ".cpp" document. For example, from
    CutrBBones.args
Cutter would generate the basic C++ code in a document named
    CutrBBones.cpp.

Cutter's ability to generate basic C++ code saves a lot of development time because the plugin writer can expend most of their creative programming efforts in modifying the ComputeOutputParams() method. Save the document as,

    maya/projects/RfM_ris/CutrBBones.cpp

Step 6 - Compile/Make the DSO

Before inspecting and editing the cpp code use Cutter to compile and link a DSO. On linux and MacOSX Cutter will automatically create and execute a makefile named Makefile.CutrBBones that it will save in the same directory as the ".cpp" file. On Windows Cutter will create and run a ".bat" file named "Build_CutrBBones.bat". Use the alt+e shortcut to generate and run the makefile. On OSX and Linux the process monitor window will open and report the creation of a DSO named "CutrBBones.so" - figure 11.

On Windows the process monitor will report,
    Creating library CutrBBones.lib and object CutrBBones.exp.
Open the RfM_ris folder and look for the newly built DSO called "CutrBBones.dll".


Figure 11 - Comfirmation of a successful build on OSX


Note: Windows

As of Cutter versions 6.8.5 it is assumed the user has a version of Microsoft Visual Studio (MVS) installed on their Windows computer. Cutter uses a MVS file named "vcvars86_amd64.bat" when it runs it compiles and builds a pattern plugin. The full path to the vcvars86_amd64.bat must be specified in preferences. For example, in figure 12 the path has been specified as follows.


    C:/Program Files (x86)/Microsoft Visual Studio 12.0/VC/bin/x86_amd64/vcvarsx86_amd64.bat


Figure 12


Step 7 - Registeration the nodeid

The .args script must be assigned a unique integer value for it's nodeid. This value is registered with HyperShade when the script is loaded by the users custom RenderMan_for_Maya.ini file.


Figure 13


The "Register" menu item will read the nodeids that are currently in use by other .args and .oso files and will attempt to assign an unused nodeid. The range of nodeids from which Cutter can choose a value is defined in Preferences.


Figure 14


Step 8 - Testing the plugin

If the registration of the "CutrBBones.args" file has been successful the plugin will appear in the "RenderMan/RIS/patterns" panel of HyperShade - figure 15.


Figure 15


It's output "resultC" can be connected to any of the Bxdf nodes and likewise most other pattern nodes will be able to feed "float" values into its "s_input" - figures 16.

 
Figure 16

Step 9 - About Code Generation

Cutter uses a template file (Cutter_Help/ris/rixpattern/template.cpp) that it fills with information obtained by parsing the users ".args" document. Cutter generates all the routine code for the following required methods.
    Init();
    GetParamTable();
    Finalize();

However, most of the creative programming effort involved in writing a custom pattern takes place within the ComputeOutputParams() method. The basic programmatic structure of the ComputeOutputParams() method is well defined and as such Cutter is able to generate code that takes care of the following "chores".

Querying the inputs
    - declares a pointer for each input
    - assigns a default value for each input
    - uses EvalParam to read the value of each input
Preparing the output
    - allocates memory for a data structure that will to store the output values.

Within the ComputeOutputParams() method is a for-loop where output values are assigned to the batch of surface points that are currently being processed by the plugin. In general terms the output values are derived from data coming not only from the plugin's inputs but also from,
      primitive variables such as 'st',
      built-in variables such as 'P',
      the values of options and attributes.

The popup menu has several options for inserting the C++ code for querying the items mentioned above. For example, choosing this menu item.


Figure 17


will insert the following code.


    // A "user" "int" option is read as a RtInt.
    RtInt iOptValue;
    err = rstate->GetOption("user:input_color_profile", &iOptValue, sizeof(RtInt),
                                           &optType, &optNumValues);
    if(err == 0 && optType == RixRenderState::k_Integer) {
        m_msg->Info("user:profile: %d", iOptValue);
        }
    else
        iOptValue = 1.0; // default value ?


Header File Lookup

Right mouse clicking on most datatypes and functions will raise a popup menu that will provide convenient access to the appropriate header file.


Figure 18


Typing Completion

A popup menu of alternative completions will appear after the first three letters have been typed. Insertion is done by hitting the tab key.


Figure 19


Pixar Docs

Control + double clicking (OSX - Apple + double clicking) a word in the pattern .cpp document will cause Cutter to open the Pixar doc "Writing Patterns".


© 2002- Malcolm Kesson. All rights reserved.