Cutter
Open Shading Language


return to main index


Links:

    Pixar PxrOSL
    OSL Specification [pdf]
    OSL Overview


Summary of Cutter's Features

    User Paths - compiler, source code and shaders
    Syntax Coloration
    Popup Menu - Metadata & Functions
    Popup Menu - rib files, ui preview and convert to args script
    Typing Completion
    Assigning a RfM Nodeid
    Listing Shader Parameters


Introduction

This tutorials outlines the features of Cutter that support the writing of OSL shaders


Syntax Coloration

Cutter applies a syntax coloration scheme to OSL source code - listing 1.


Listing 1 - OSL Syntax Coloration


shader
st2color(
    float s = 0 
        [[
        int lockgeom = 0
        ]],
    float t = 0 
        [[
        int lockgeom = 0
        ]],
    output color resultRGB = 0)
{
resultRGB = color(s, t, 1);
}

Syntax colors can be set by the "Colors" preferences panel for ".osl" - figure 1.


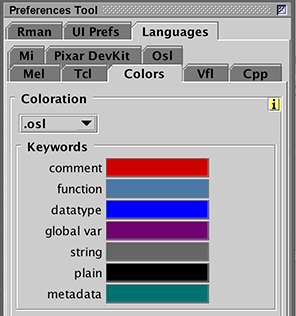
Figure 1 - Syntax Colors


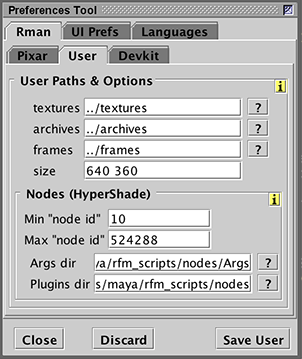
Osl Compiler, Source Code and Compiled Shaders Paths

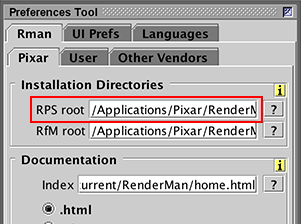
If shaders are to be compiled for use with RenderMan the path to RPS root must be set in the Installation Directories panel - figure 2.

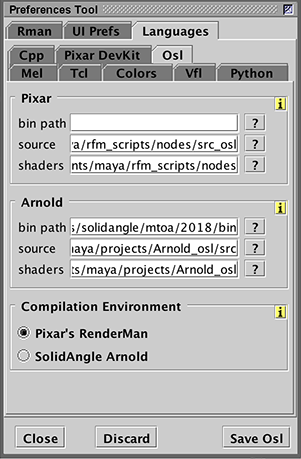
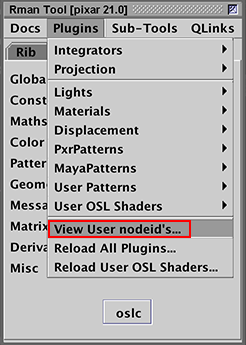
If the shaders will be used with Arnold the full path to the SolidAngle bin directory must be set in the Languages->Osl tab panel - figure 3. For both Pixar and Arnold the full paths to the users source code and compiled shaders directories must be specified. However, the Pixar bin path can be left empty if the path to RPS root has been specified.

When an OSL source code file is open on Cutter's desktop it can be conveniently compiled with the keyboard shortcut ALT + e, CONTROL + e or APPLE + e. The last panel shown in figure 3 enables the user to specify whether Pixar's oslc or SolidAngle's oslc should be used for shader compilation.

When compiling a shader for use with Arnold, Cutter will automatically generate a .mtd file for each compiled shader.


Figure 2 - Path to RenderManProserver


Figure 3


User Source Code & Compiled Shaders Paths

Example paths might be as follows.

maya/projects/
             |_ Arnold_osl/         <<-- compiled .oso files go here
                          | src/   <<-- source code .osl files go here
maya/rfm_scripts/           
                |_ nodes/           <<-- compiled .oso files go here
                        | osl_src/ <<-- source code .osl files go here


Popup Menu - Metadata & Functions

The popup menu (right mouse button) for .osl documents is context sensitive. When activated in the parameter declarations block the following options are available.


Figure 5


If the cursor is positioned within a metadata block ie. between opening and closing square brackets, [[ ]], metadata hints can be conveniently inserted. For example, in figure 5 if "Label" had been chosen the following metadata would have been inserted.

shader
cell_noise(
    float frequency = 5 
        [[
        string label = "Your Label",
        ]],
    float variation = 1,

If the popup is activated within the body of the shader the following options are available.


Figure 6


Miscellaneous Actions Menu - UI Preview

The Misc Actions menu enables the UI of the shader to be previewed in a web browser. This is useful when adding metadata to customize the "look" of the shader without the need to load it in HyperShade.

If the current oslc compiler (figure 3) is Pixar's RenderMan, the menu will also enable Rib files to be generated that can be used to test a shader without the need to load the shader in Maya's HyperShade.


Figure 7


The last menu item offers a convenient way of creating an .args file that defines the UI of a C++ pattern plugin that will be the equivalent to a shader. For example, the osl shown on the left would generate the args on right.


shader
stToColor(   
    float s = 0 [[
                string widget = "null",
                int lockgeom = 0
                ]],
    float t = 0 [[
                string widget = "null",
                int lockgeom = 0
                ]],
    color patcolor = color(1,1,0)
                [[
                string label = "Pattern Color",
                ]],
    output color resultRGB = 0
    )
<args format="1.0">
    <shaderType>
        <tag value="pattern"/>
    </shaderType>
    <help>
        No Description Available.
    </help>
        <param name="patcolor"
            label="Pattern Color"
            type="color" default="1 1 0" 
            input="True">
            <tags>
                <tag value="color"/>
            </tags>
        </param>
        <output name="resultRGB"
            label="resultRGB">
            <tags>
                <tag value="color"/>
            </tags>
        </output>
  
    <rfmdata nodeid="1" classification="rendernode/RenderMan/pattern"/>
</args>


Typing Completion

Cutter also implement simple typing completion. Completion is activated by the tab key.


RenderMan - Assigning a RfM Nodeid

RenderMan for Maya (RfM) version 21 introduced a way of pre-registering compiled shaders for direct use as specific nodes in HyperShade without the need to use the generic PxrOSL node. The registration relies on the presence of metadata of the following form.

shader
cell_noise
[[
int rfm_nodeid = 10,
string rfm_classification = "rendernode/RenderMan/pattern",
string help = "Brief description goes here."
]]
(

The value of rfm_nodeid must be a unique integer. A range of nodeids can be obtained by studios from AutoDesk so that they do not load shaders and .args files that define nodes that will clash with other nodes. However, individuals who do not intend to distribute shaders (or .args files) are free to use nodeid values in the range 10 to 524288.

The range of nodeids to be used for shaders (and .args files) can be set in Cutter's preferences.


Figure 8


To help automate the chore of assigning a nodeid to a shader the popup menu has an Assign NodeID menu item.


When the item is selected Cutter will examine the nodeids that have been assigned to the users shaders and .args files and will either insert or update the metadata at the head of the shader. A summary of the all the users nodeids can be generated from the Rman Tools->Plugins menu.


Figure 9


This functionality has been provided so that users can check if a nodeid is used by more than one shader or .args file.


Listing Shader Parameters

The "procs" button now provides a way of finding a specific parameter. This is useful when editing a shader with many parameters. The name of each parameter is prefixed with the name of its page.


Figure 10


© 2002- Malcolm Kesson. All rights reserved.