OSL
Use in HyperShade


return to main index


Introduction

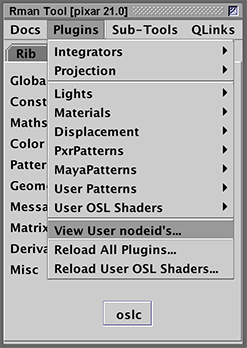
There are two ways of using a compiled .oso shader with Maya's HyperShade. The most direct way is click the tab key in HyperShade's work area, type "osl" and select "PxrOSL" from the menu.
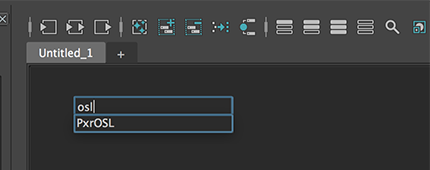
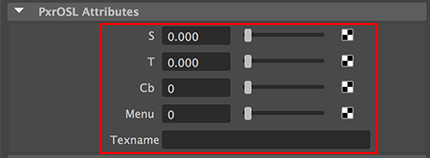


Figure 1


The browse button enables the compiled shader to be loaded.
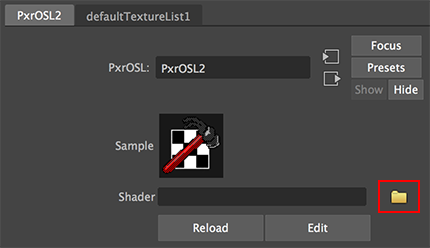
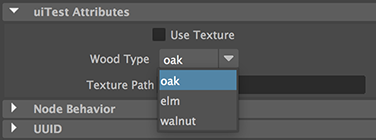


Figure 2


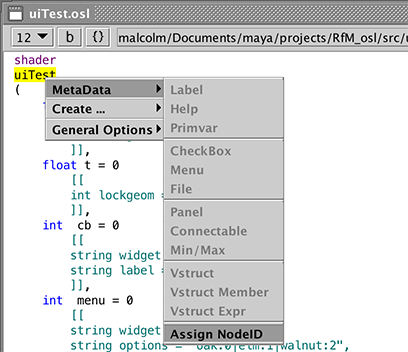
Although using the PxrOSL node is convenient it does have one major drawback - it ignores shader metadata. For example, the shader shown below has metadata intended to customize the UI of each parameter.


Listing 1 - uiTest.osl


shader
uiTest( 
    float s = 0 
        [[
        int lockgeom = 0,
        ]],
    float t = 0 
        [[
        int lockgeom = 0,
        ]],
    int  cb = 0 
        [[
        string widget = "checkBox",
        string label = "Use Texture",
        ]],
    int  menu = 0 
        [[
        string widget = "mapper",
        string options = "oak:0|elm:1|walnut:2",
        string label = "Wood Type",
        ]],
    string texname = ""  
        [[
        string widget = "filename",
        string label = "Texture Path",
        ]],
     output color resultRGB = 0)
{
resultRGB = color(s,t,1);
}

When used by an instance of the PxrOSL node the metadata is ignored and consequently we get a barebones UI.


Figure 3


However, using the method outlined in the next section of this tutorial the UI specified by shader metadata is used correctly.


Figure 4


Unfortunaely, the second method is more complex and relies on,
    - registering a shader's UI with the users RenderMan_for_Maya.ini script,
    - loading the shader via the users RMSWorkspace.ini script, and
    - assigning a unique rfm_nodeid to the shader.


Step 1: Registering a UI and Loading a Shader

If the reader has downloaded the scripts presented in the tutorial "RfM: Customizing" this step is straightforward. Assuming the reader is using the Cutter text editor the following preferences should be set.


Figure 5


Example Paths

 1  C:/Users/jdoe/Documents/maya/projects/RfM_osl/src
 2  C:/Users/jdoe/Documents/maya/projects/RfM_osl
 3  C:/Users/jdoe/Documents/maya/projects/RfM_ris/Args
 4  C:/Users/jdoe/Documents/maya/projects/RfM_ris
 5  C:/Users/jdoe/Documents/maya/projects/RfM_ini/RenderMan_for_Maya.ini

The RenderMan_for_Maya.ini downloaded from the "RfM: Customizing" tutorial will automatically attempt to register the metadata for each compiled shader it finds in the directory specified by the second preference. Likewise the users custom RMSWorkspace.ini will attempt to load the compiled shaders when Maya is launched.


Step 2: Assigning a Unique rfm_nodeid

Again, assuming the reader is using Cutter this step is also straightforward. Right mouse click on the name of the shader and select Assign NodeID.


Figure 6


Cutter will the users shaders and custom pattern .args files, find an unused nodeid and then insert metadata immediately after the name of the shader. For example,

    shader
    uiTest
    [[
    int rfm_nodeid = 10,
    string rfm_classification = "rendernode/RenderMan/pattern",
    string help = "Brief description goes here."
    ]]

A report showing which nodeid's are currently in use can be generated using Rman Tool.


Figure 7


Successfully registered and loaded shaders will appear the Patterns listing of HyperShade.


Figure 8


© 2002- Malcolm Kesson. All rights reserved.