RfM
Python Rifs Getting Started 1


return to main index


Code

       rif_utilities.py


Introduction

This tutorial proceeds, step-by-step, in demonstrating the development of several rifs that augment and/or replace polymesh objects in a Maya scene.


Setting-up Maya

1. Set a project directory, say, maya/projects/default.
2. In Render Settings choose the PxrOcclusion intergrator.
3. In the Script Editor create a python tab and name it "Rif_Py".
4. In the Script Ediror create a mel tab and name it "Add_Primvar".
5. Create two polymesh objects, say, a 8x8 sphere and a cube.
6. Save the Maya scene.


Basic PolyMesh Rif

Lisitng 1 provides a barebones python script that implements a rif that will pre-process the polygonal data of each mesh object. The method named "PointsGeneralPolygons" is implemented by the prman.Rif class. Since our custom class is derived from Pixar's prman.Rif class our custom class can override the base class implementation of the "PointsGeneralPolygons" method.


Listing 1 - rif_mesh_geo1.py


import prman 
class Rif(prman.Rif):
    def __init__(self, ri):    
        prman.Rif.__init__(self, ri)
                   
    def PointsGeneralPolygons(self, nloops, nverts, verts, params):
        self.m_ri.PointsGeneralPolygons(nloops, nverts, verts, params)

Before tinkering with the implementation of "PointsGeneralPolygons" method we must ensure the customized batch rendering scripts provided in the tutorial RfM 23: Customizing can apply our custom rifs.

1. Copy and paste listing 1 into a document and save it as,
      maya/rfm_scripts/python/rif_mesh_geo1.py

2. In the Rif_Py tab of the script editor execute the following text,

import batch
import rif_mesh_geo1
reload(rif_mesh_geo1)
rifs = ['rif_it','rif_mesh_geo1' ]
batch.render(1,1, rifs)

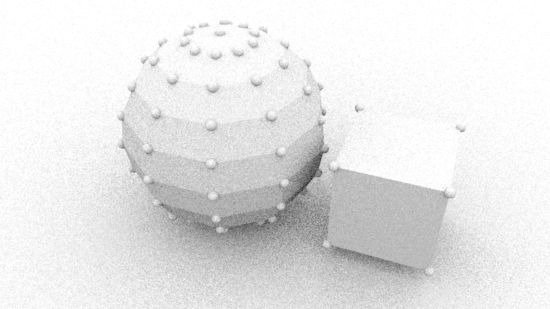
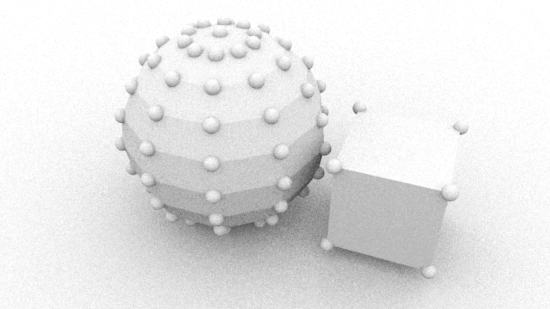
3. An image similar to figure 1 should appear in the Image Tool ("it") window.
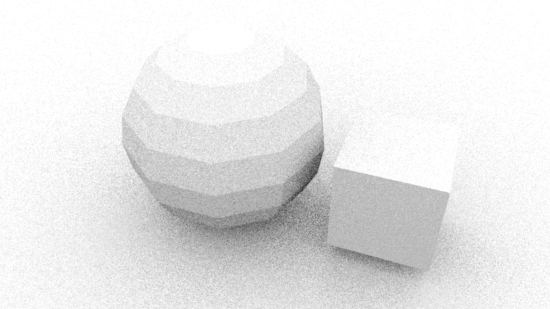


Figure 1


Most of the data that our rifs will use is contained in the python dictionary of the last arg of the PointsGeneralPolygons method, namely, params.


The "params" Dictionary

We will begin by printing the keys of the dictionary. Edit the "PointsGeneralPolygons" method.

    def PointsGeneralPolygons(self, nloops, nverts, verts, params):
        print params.keys() # <-- new
        self.m_ri.PointsGeneralPolygons(nloops, nverts, verts, params)

Execute the code in the Rif_Py tab and two lines of text, one line per poly object, will be echoed in the script editor.

['facevarying float[2] st','vertex point P','facevarying normal N']
['facevarying float[2] st','vertex point P','facevarying normal N']

Next, we will see what vertex data is referenced by the "vertex point P" key. But before doing so ensure only one object is visible in the viewport, say, the cube. Edit the "PointsGeneralPolygons" method as follows.

    def PointsGeneralPolygons(self, nloops, nverts, verts, params):
        print params['vertex point P'] # <-- new
        self.m_ri.PointsGeneralPolygons(nloops, nverts, verts, params)

Execute the code in the Rif_Py tab. A tuple that specifies the vertices of the mesh will be echoed in the script editor.

(-0.6695894002914429, -2.1561105251312256, -0.41178059577941895, ...more...)

In total, for a cube, the tuple will contain 24 coordinates ie. 8 vertices x 3 coordinates per vertex. Indexing into the params dictionary was accomplished using the explicit string 'vertex point P'. However, this text is defined in the prman module ie.

    /Applications/Pixar/RenderManProServer-22.2/bin/prman.py

Therefore, the key to the vertex data of the params dictionary is normally using the pre-defined constant ie.

    params[prman.Ri.P]


Using the Vertex Data to Place Spheres

Save the following script as rif_mesh_geo2.py and edit the Rif_Py tab so that it imports, reloads and calls the new rif_mesh_geo2 module. For example.

import batch
import rif_mesh_geo2
reload(rif_mesh_geo2)
rifs = ['rif_it','rif_mesh_geo2']
batch.render(1,1, rifs)

Listing 2 - rif_mesh_geo2.py


import prman 
class Rif(prman.Rif):
    def __init__(self, ri):    
        prman.Rif.__init__(self, ri)
                   
    def PointsGeneralPolygons(self, nloops, nverts, verts, params):
        ##___________________________________
        coords = params[prman.Ri.P]
        for n in range(0, len(coords), 3):
            x = coords[n]
            y = coords[n+1]
            z = coords[n+2]
            self.m_ri.TransformBegin()
            self.m_ri.Translate(x,y,z)
            self.m_ri.Sphere(0.1, -0.1, 0.1, 360.0, {})
            self.m_ri.TransformEnd()
        ##___________________________________
        self.m_ri.PointsGeneralPolygons(nloops, nverts, verts, params)        

Using the new rif should produce an image similar to figure 2.


Figure 2


The next rif shows how the code needed to place geometry at each vertex can be reduced by outputting RenderMan Points - particles.


Using the Vertex Data to Place Points

Save the following script as rif_mesh_geo3.py and edit the Rif_Py tab - the new code is shown below. Note the use of the rif_mesh_geo3.Rif(0.3).

import batch
import rif_mesh_geo3
reload(rif_mesh_geo3)
rifs = ['rif_it','rif_mesh_geo3.Rif(0.3)' ]
batch.render(1,1, rifs)

Listing 3 - rif_mesh_geo3.py


import prman
class Rif(prman.Rif):
    def __init__(self, ri, width):    
        prman.Rif.__init__(self, ri)
        self.width = width
                   
    def PointsGeneralPolygons(self, nloops, nverts, verts, params):
        ##___________________________________
        points_params = {prman.Ri.P  : params[prman.Ri.P], 
                         prman.Ri.CONSTANTWIDTH : self.width }    
        self.m_ri.Points(points_params)
         ##___________________________________
        self.m_ri.PointsGeneralPolygons(nloops, nverts, verts, params)

The code demonstrates how an input to control the size of each Point is implemented. Using the new rif should produce an image similar to figure 3.


Figure 3


The next rif shows how polymesh objects in Maya can be "tagged" to either be rendered without additional vertex Points, or rendered only as Points or rendered so that both the base mesh and the additional points appear in the image.


Controlling the Render Mode of Polymesh Objects

Select both polymesh surfaces in Maya and execute the following MEL procedure in the Add_Primvar tab of the script editor.

addFloatPrimVar("render_mode", 1);

In the Channels Box (Shapes panel) note a custom channel named rmancFrender_mode has been added to both objects. Change the value of one of the shapes from 1.0 to 2.0. The prefix rmancF ensures a primvar named "render_mode" will added to each polymesh. For information about primvars refer to the tutorial "RIB: Introduction to Primvars". For detailed information about RfM and primvars refer to the Pixar doc "Under the Covers".

Also, note the rif uses an additional module named rif_utilities. Download rif_utilities.py and save it in the following directory.

    maya/rfm_scripts/python

Listing 4 - rif_mesh_geo4.py


import prman
from rif_utilities import getFloatPrimvar
  
class Rif(prman.Rif):
    MESH = 0
    POINTS = 1
    POINTS_AND_MESH = 2
    DEFAULT_MODE = MESH
    def __init__(self, ri, width):    
        prman.Rif.__init__(self, ri)
        self.width = width           
    def PointsGeneralPolygons(self, nloops, nverts, verts, params):
        ##___________________________________
        render_mode = int(getFloatPrimvar('render_mode', params, Rif.DEFAULT_MODE))
        if render_mode == Rif.MESH:
            self.m_ri.PointsGeneralPolygons(nloops, nverts, verts, params)
            return
        points_params = { 
                         prman.Ri.P : params[prman.Ri.P], 
                         prman.Ri.CONSTANTWIDTH : self.width 
                        }    
        self.m_ri.Points(points_params)    
        if render_mode == Rif.POINTS_AND_MESH:
            self.m_ri.PointsGeneralPolygons(nloops, nverts, verts, params)
         ##___________________________________

Using the new rif should produce an image similar to figure 4.


Figure 4


© 2002- Malcolm Kesson. All rights reserved.