Rib
Stereo Rendering & Anaglyphs


Note:

This tutorial is in an early stage of development. The tutorial assumes the reader has access to prman version 13.5 and higher. For convenience the reader will also require access to Shake.
MK Jan 2008.


DisplayChannel "float a"   # output the alpha channel to camera_right.tif 
DisplayChannel "color Ci"  # output the surface color to camera_right.tif
  
Projection "perspective" "fov" [40]
Format 640 480 1
ShadingRate 5
  
# Right camera viewing transformations
TransformBegin 
    Translate  0 0 20
    Rotate  -10  1 0 0
    Rotate  0  0 1 0
    Scale 1 1 -1
    Camera "right"
TransformEnd
  
#Display "camera_left.tif" "it" "rgba"    #  <<-- activate for on-screen viewing
# Save left and right camera images to file
Display "camera_left.tif" "tiff" "rgba" 
Display "+camera_right.tif" "tiff" "Ci,a" "quantize" [0 255 0 255] "string camera" ["right"]
  
# Left camera viewing transforms
Translate  -0.05 0 20
Rotate  -10  1 0 0
Rotate  0  0 1 0
Scale 1 1 -1
  
WorldBegin 
    TransformBegin
        Translate -3.5 0 0
        ReadArchive "rotated_cylinders.rib"
    TransformEnd
    TransformBegin
        Translate 3.5 0 0
        Rotate 45  0 0 1
        Rotate 180 0 1 0
        ReadArchive "rotated_cylinders.rib"
    TransformEnd
WorldEnd 

Introduction

With release 13.5 of Pixars prman the renderer can now render two camera simultaneously. The primary documentation about this facility can be found at,

    Pixar_docs/prman_technical_rendering/AppNotes/multiCamera.html

Pixars documentation addresses several technical issues related to view-dependent shading. This tutorial ignores the impact that stereo rendering has on shader writing. Instead this tutorial concentrates on the production of "cheap and cheerful" colored images suitable for viewing with (old fashioned) red and cyan spectacles. The tutorial is intended to help a reader experiment with stereo rendering without having to bother with the paraphenalia of stereo projectors, or high performance flat panel displays and "passive" spectacles, or "active" (switched) spectacles.


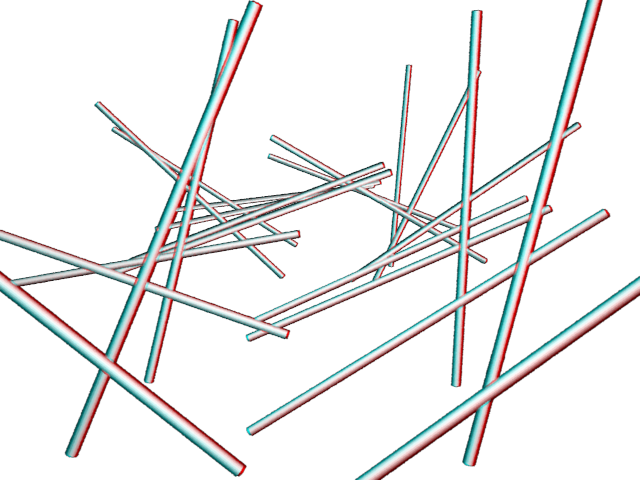
Figure 1 - Left and Right Stereo Images


The rib file shown above will act as a template for two-camera rendering. It assumes the scene to be rendered can be "imported" using the ReadAchive statement. As can be seen from figure 1 the (test) scene consists of 20 rotated cylinders. Two other assumptions are also made, namely,
    1   the left and right cameras will remain parallel,
    2   the fixed camera, defined by the following statements,

        TransformBegin 
            Translate  0 0 20
            Rotate  -10  1 0 0
            Rotate  0  0 1 0
            Scale 1 1 -1
            Camera "right"
        TransformEnd

will always define the "right" camera. Consequently, adjustments to the separation between the cameras will be made to the x-translation of the principle (left) camera. For example, the current separation is -0.05 units.

    Translate  -0.05 0 20

In all other respects it is up to the reader to ensure, when they edit the rib file, the transforms applied to the left and right camera remain the same.
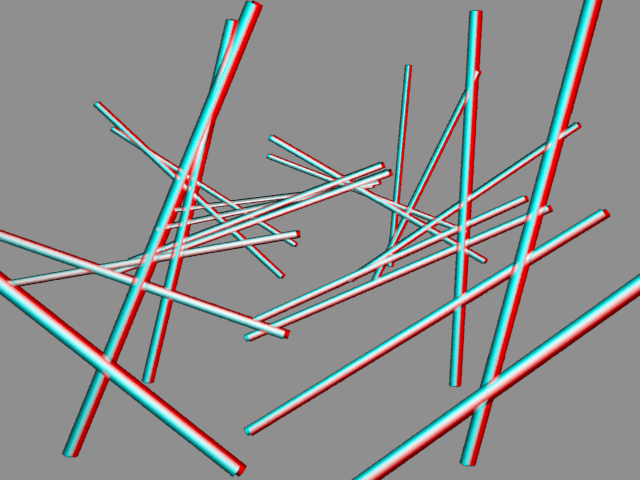
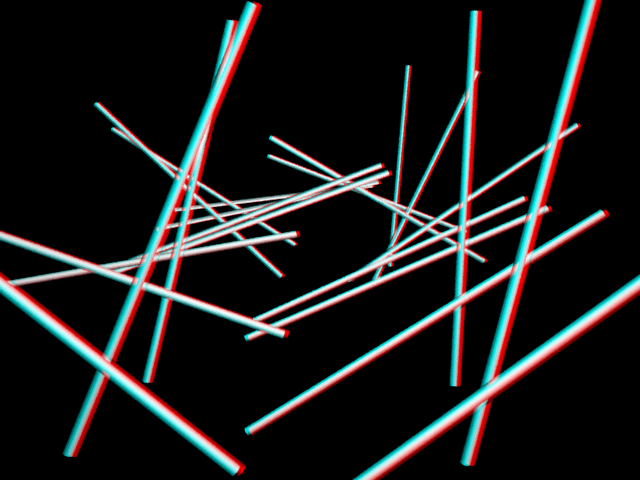

Converting Stereo Images to an Anaglyph

Listing 2 presents a Shake script that colorizes and combines two rendered tif files into a single red/cyan anaglyph - figure 2.


Figure 2


For a description of how to do the conversion using PhotoShop refer to "Mark Newbold's Stereo 3D Stuff" at,

    http://dogfeathers.com/3d/3dhowto.html

Listing 2 (anaglyph.shk)


image left_src = FileIn("camera_left.tif");
image left_no_red = Mult(left_src, 0, 1, 1, 1, 1);
  
image right_src = FileIn("camera_right.tif");
image right_red_only = Mult(right_src, 1, 0, 0, 1, 1);
  
image final = IAdd(left_no_red, right_red_only);
FileOut(final, "anaglyph.png");

The Shake script produces an output image that is suitable for viewing on a web page - hence the "png" format, although "jpg" could also be specified. It is possible to automate the process of rendering, image conversion and viewing by using two System statements after the WorldEnd. For example, the first System statement should invoke Shake,

    System "shake -script ./anaglyph.shk"

When using Cutter, the rendered images produced by the rib file will be saved by prman in Cutter's directory. A relative path to "anaglyph.shk" can be used as long as the Shake script is also saved in the Cutter directory. Listing 3 gives the code for a simple web page that can be used to view an anaglyph. Again it is assumed the html file will be saved in the same directory as Cutter.


Listing 3 (camera_viewer.html)


<!DOCTYPE HTML PUBLIC "-//W3C//DTD HTML 4.0 Transitional//EN" 
"http://www.w3.org/TR/REC-html40/loose.dtd">
<HTML>
<HEAD>
<TITLE>3D Viewer</TITLE>
<LINK rel=StyleSheet href="RELATIVE_PATH.css" TYPE="text/css" TITLE="YOUR_STYLE_NAME">
  
</HEAD>
<BODY BGCOLOR="#666666">
<BR>
<img src="anaglyph.png" alt="" border="1">
</BODY>
</HTML>

The text for the second System statement depends on the readers OS. For example,

        Linux/Mozilla
    System "mozilla ./camera_viewer.html"
        Windows/Mozilla
    System "ixplore ./camera_viewer.html"
        OSX/Safari
    System "open -a /Applications/Safari.app ./camera_viewer.html"

Camera Separation

Deciding on an appropriae value for the separation of the left and right cameras is a subject for experimentation. Factors that contribute to the choice of camera separation are,
    camera to world distance
    camera "fov"
    image Size
    image background color
For example, figures 3, 4, 5 and 6 were all rendered with a camera separation of 0.1 units yet the perception of depth is very different depending on image size and background color.


Figures 3 and 4 - 320x240 pixels


Figure 5 - 640x480 pixels


Figures 6 - 640x480 pixels


Colored Glasses

Good photography stores will sell colored "lighting filters" or "gels" - sheets of colored acetate. Bogan Imaging Inc. manufactures such filters in many different colors. Unfortunately, they do not produce a cyan filter. The anaglyphs produced by the Shake script (listing 2) for the purposes of this tutorial were viewed using primary red and green filters. The filters worked quite well. There are, however, several companies that advertise on the internet that sell red/cyan glasses designed specifically for viewing anaglyphs.


© 2002- Malcolm Kesson. All rights reserved.