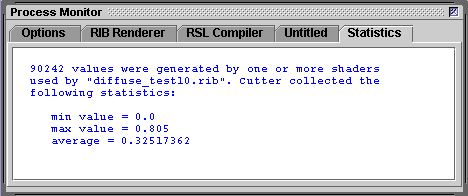
RSL
Shader to Shader Messaging


return to main index


Introduction

This tutorial provides code that demonstrates how values calculated in a displacement shader can be accessed by a surface shader - both shaders must be assigned to the same surface. For example, figure 1 shows the effect of a surface shader that querries the displacement values in order to assign white to the peaks of the bumps.
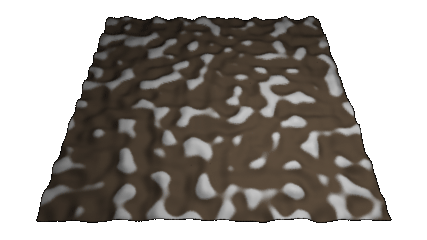

Figure 1


The Pixar documentment that deals with this topic is,
    Shader and Message Passing Functions


Data Out/Data in

The code for a pair of shaders is shown below (listings 1 & 2). The first shader outputs a value called hump so that the surface shader can create the illusion of snow - figure 1. Although the shaders are far from sophisticated, they are a good starting point for developing cooperating shaders that could generate very interesting visual effects.


Listing 1


displacement messageout(float  Km = 0.1,
                               freq = 4;
         output varying float  hump = 0)
{
vector n = normalize(N);
  
hump = noise(P * freq);
  
/* Move the surface back to its 
   original position */
hump = hump - 0.5;
   
/*
printf("%f\n", hump);
*/
   
P = P - n * hump * Km;
N = calculatenormal(P);
}


Listing 2


surface messagein(float Kd = 0.5,
                        snow_ht = 0.0;
                color   snow_color = 1,
                        ground_color = color(0.466,0.388,0.309)
                        )
{
vector  n = normalize(N),
        nf = faceforward(n, I);
float   height = 0;
  
Oi = Os;
  
/* Add snow according to the bump height */
if(displacement("hump", height) == 1)
    {
    float blend = smoothstep(snow_ht-0.05,snow_ht+0.05,height);
    surfcolor = mix(ground_color,snow_color,blend); 
    }
  
color  diffusecolor = Kd * diffuse(nf); 
Ci = Oi * Cs * diffusecolor;
}


Output Values Min/Max

Because the output value in listing 1 is equal to noise() less 0.5 we know it will range in value from -0.5 to +0.5. However, output values are often based on a series of calculations and as such it can be difficult of anticipate their min and max values.

The printf() function can be used to print single or multiple values to the "terminal" from which the rib file that uses a shader is rendered. Cutter can capture the values in two ways.


Figure 2


If a single value is written by the printf() statement, Cutter will generate some simple statistics, figure 2, that can be helpful in determining how a particular output value should be "manipulated" prior to being used by a surface shader.

Alternatively, if you wish to view a sequence of multiple values you can either render a rib file from the command prompt or you can direct Cutter (figure 3) to output a log file named rman_monitor.log. The log file will be saved in the same directory as cutter.jar.


Figure 3


Once the range of values is known remove or comment the printf statement in the shader source code.


© 2002- Malcolm Kesson. All rights reserved.