RSL
Shading Language Overview


return to main index


Introduction

Because rib files are used to convey information from a modeler to a renderer, RenderMan implicitly stresses an important distinction between, what is referred to in the Pixar literature, as

  • shape - the geometry of an object ie. the output of a modeler, and
  • shading - the appearance of an object ie. the output of a renderer.

For example, figure 1, despite its appearance, consists only of two closely spaced square polygons that been been transformed by the "shading" techniques of displacement, texture, specular and transparency mapping.


cody_pebble
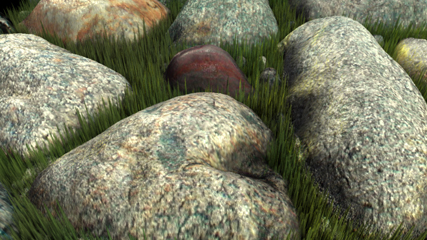
Figure 1 Image by Stephen Cody of the Savannah College of Art and Design


Shaders

Clearly, shaders play a crucial creative role in defining the appearance of CG a production. RenderMan has been adopted by many leading studios because it allows special purpose shaders to be added to those that already exist.

Individual shaders are small sub-routines (functions) written in a specialised programming language called the RenderMan Shading Language (RSL). The language enables new shaders to extend the creative possibilities of the renderer; it allows computer artists to find endless ways of controlling the appearance of a 3D scene through the use of custom shaders. The only limit is their imagination, their ability to write new, or adapt existing shaders and their creative flare at adjusting the parameters that control the visual effect of a shader.

In some respects RenderMan shaders are analagous to plugins for, say, PhotoShop and AfterEffects. Plugins for those applications provide extra functionality to their host program. Likewise, shaders "work" within the environment of a renderer.


Shader Types

While shaders are generally independent of each other ie. any surface shader may be used with any displacement shader, each type of shader has a specific role in the rendering process. Therefore, a surface shader such as plastic cannot be used as a displacement shader.

RenderMan divides the rendering process into six tasks each of which uses a distinctive type of shader. They are,

  • light source shaders,
  • surface shaders,
  • displacement shaders,
  • volume shaders,
  • transformation shaders, and
  • imager shaders.

Shaders calculate specific values at more or less regular intervals across the surfaces being shaded by a renderer. A RenderMan complient renderer sub-divides each object in a 3D scene into a fine mesh of micro-polygons.

A renderer, as a consequence of processing a rib file, or some other source of rib information, makes data available to the shader so that the shader can calculate specific values. A displacement shader, for example, calculates a displaced location and orientation for each micro-polygon. A surface shader, on the other hand, determines the apparent color and opacity of each micro-polygon.


Shading Language Variables

Data going "into" a shader, as well as the values calculated by a shader are stored in memory locations that hold, what is referred to, as variables. Each time a shader is called ie. used by the renderer, it gets data from,


  1. specific parameter values assigned to a shader, perhaps as a result of using Maya and Pixars SLIM shader interface - these are stored in a shaders instance variables,
  2. internal data the renderer calculates and then makes available to a shader - these are stored in global variables, and finally,
  3. private data that temporarily stores the results of its own calculations are kept in local variables.
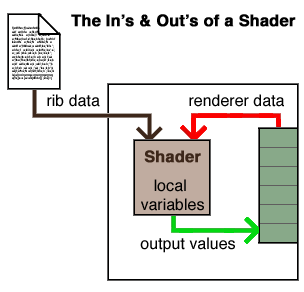

Figure 2


Shaders use global variables to read data from the renderer (shader input), for example, the color of a surface.

Shaders also use some global variables to write data to the renderer (shader output), for example, the apparent color of the light leaving the surface being shaded.


Shading Language Data Types

The Shading Language uses the following data types:

  • float, same as the 'C' language,
  • string, similiar to an array of characters in the 'C' language,
  • point, stores the xyz coordinates of a location in 3D space,
  • normal, stores the xyz coordinates of a surface normal,
  • vector, stores the xyz coordinates of a vector,
  • color, represents the color and opacity of a light source or a surface,
  • matrix, a list of 16 floats.

Notice that integers are not supported by the language, therefore, all single values must be declared as a float. Also local variables cannot use the string data type.


Writing and Compiling a Shading Language File

Writing a shader in the Shading Language is similiar to writing an application in the 'C' language. Like a 'C' language source file (.c), code in the Shading Language is written with a text editor, but named with a .sl file extension. The easiest way to write a shader is to use the Cutter text editor because it has the following facilities.

  • access to simple shader templates - figure 3,
  • syntax coloration of RSL code,
  • alt + e + double click on a RSL keyword key to access Pixar's documentation,
  • alt + e hot key compilation of shader source code.


Figure 3 - accessing shader templates


Successful compilation produces a shading language object file ie. a shader. The extension of the shader file will vary from one RenderMan complient system to another. For example, Pixar's system uses ".slo" as the file extension for shaders compiled with their "shader" compiler. The name of the shader file will match the name of the shader defined by the code rather than the name of the .sl file. When using Cutter, shader files will be saved to a "shaders" directory specified by the user in Cutter's preferences.

SL source code files can be compiled from a command prompt window (Windows) or a shell (linux and MacOSX). For example, compiling a file called test.sl, using Pixars compiler, is done as follows,

    (prompt%) shader test.sl

A Basic Rib File For Testing a Shader

Once a shader has successfully compiled you will want to test it. This can be accomplished using Maya (plus a Pixar's mtor or Rfm plugin) or Houdini (does not require a plugin). Alternatively, a sample rib file might be edited so that it uses your new shader. Again, Cutter speeds up development by generating and rendering either single frame or multiple frame rib files.

The following rib file can be used to test a shader. A file of this type is generated automatically by Cutter.


Listing 1


Display "shader tester" "framebuffer" "rgba"
Format 427 240 1
Projection "perspective" "fov" 40
ShadingRate 1
  
Translate 0 0 5
Rotate -30 1 0 0
Rotate   0 0 1 0
Scale 1 1 -1

WorldBegin
    LightSource "pointlight" 1 "intensity" 35 "from" [1 4 1]    
    AttributeBegin
        Surface "YOUR_SHADER"
        Scale 4 4 1
        Polygon "P" [-0.5 0 -0.5  -0.5 0 0.5  0.5 0 0.5  0.5 0 -0.5] 
                "st" [0 0  0 1  1 1  1 0]
    AttributeEnd
WorldEnd

When this rib file is rendered via Cutter a dialog box will prompt the user to add three Options to the beginning of the document. The Options will be automatically added to the users rib file. For example,


Option "searchpath" "texture" "../../textures"
Option "searchpath" "shader" "@:../../shaders"
Option "searchpath" 
"archive" "../archives:Cutter_Help/templates/Rib:custom_templates/Rib"

Without these Option lines the user will be required to specify full paths to their custom shaders, textures and rib archives. By default, rib files generated by Cutter always begin with Options based on the users settings in Cutter's preferences.


© 2002- Malcolm Kesson. All rights reserved.