Cutter
Key Framing


return to main index


Introduction

The RenderMan Interface allows an animation to be defined in two ways,

  • via several rib files each defining a single frame of an animation, or
  • via a single rib file that defines a sequence of frames of an animation.

Commercial software such as Maya and Houdini use the first method - one rib file per frame of animation. A small part of a rib file that uses the second method ie. multiple FrameBegin/FrameEnd blocks is shown below.


Listing 1


FrameBegin 1
    Display "grow.001" "tiff" "rgba"
    Projection "perspective" "fov" 45
    Format 400 300 1
    Translate 0 0 5
    Rotate -110  1 0 0
    Rotate 70  0 0 1
    WorldBegin
        Color 0 1 0 #green cone
        Cone 0.25 0.75 360
    WorldEnd
FrameEnd
:
: (additional FrameBegin / FrameEnd blocks)
:
FrameBegin 16
    Display "grow.016" "tiff" "rgba"
    Projection "perspective" "fov" 45
    Format 400 300 1
    Translate 0 0 5
    Rotate -110  1 0 0
    Rotate 70  0 0 1
    WorldBegin
        Color 0 1 0 #green cone
        Cone 1.25 0.75 360
    WorldEnd
FrameEnd

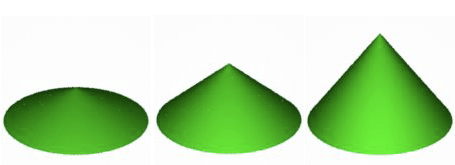
Each frame of the animation is enclosed within the paired statements, FrameBegin / FrameEnd. In this example a cone is increasing in height from 0.25 to 1.25 units.

Cutter includes a keyframing facility that enables simple animations to be made relatively easily. Animations are defined by a type of file that Cutter recoginizes as a key frame document - they have a .key file extension. Such key frame documents are 99% pure rib to which a couple of custom (not true rib) statements have been added. Before "sending" such documents to a RenderMan complient renderer, Cutter pre-processes the data contained in a key frame document and produces a "proper" rib file containing a sequence of frame blocks or, depending on the users preference (figure 1), a sequence of numbered rib files.
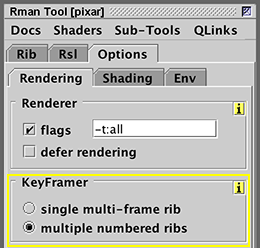


Figure 1

Creating a Key Frame (.key) Document

A common technique used in animation is to define a series of key frames that specify the characteristics of a scene that undergoes change over a period of time. In this way an animator does not have to attend to the specific details of an animation on a frame by frame basis. Unfortunately, RenderMan only deals with animations at this low level - it does not have a of key frame statement built into its scene description language.

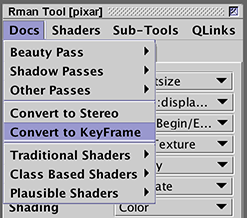
key frame documents can be written from scratch but its nearly always easier to have an existing rib file open on Cutters desktop (this must be the top window) and then choose RmanTool->Docs->Convert to KeyFrame.


Figure 2


Cutter will automatically produce a key frame document that duplicates the (source) rib as a pair of KeyFrameBegin / KeyFrameEnd blocks. A very simple example of a key frame document is shown below.


Listing 2


Display "grow" "framebuffer" "rgb"
Format 150 150 1
  
Tween "output" "all"
Tween "from" 1 "to" 2 "frames" 16
  
KeyFrameBegin 1
    Projection "perspective" "fov" 45
    Translate 0 -0.2 2
    Rotate -110 1 0 0
    Rotate 70 0 0 1
    WorldBegin
        Color 0 1 0 #green cone
        Cone 0.25 0.75 360
    WorldEnd
KeyFrameEnd
KeyFrameBegin 2
    Projection "perspective" "fov" 45
    Translate 0 -0.2 2
    Rotate -110 1 0 0
    Rotate 70 0 0 1
    WorldBegin
        Color 0 1 0 #green cone
        Cone 1.0 0.75 360
    WorldEnd
KeyFrameEnd


Figure 3

In particular, notice the Display and Format statements are defined outside of the KeyFrameBegin/KeyFrameEnd blocks. The first custom statement,


    Tween "output" "all"

tells Cutter to produce a rib file containing all the frames of an animation. The second Tween statement tells Cutter to create 16 frames.


    Tween "from" 1 "to" 2 "frames" 16

Alternatively, Cutter will produce a single preview frame, say frame 10, if the first Tween statement is of the following form.


    Tween "output" 10

Any number of key frames can be defined within a .key document so long as each KeyFrameBegin statement has a unique number. For example, the .key document shown above could have had the following "extra" keyframe.


Listing 3


KeyFrameBegin 3
    Projection "perspective" "fov" 45
    Translate 0 -0.2 2
    Rotate -110 1 0 0
    Rotate 70 0 0 1
    WorldBegin
        Color 0 0 1
        Cone 1.0 0.75 360
    WorldEnd
KeyFrameEnd

Pairs of key frames that are to be Tween'd must have an identical structure - only numeric parameters are allowed to vary. For example, it would be illegal to substitute the cone in key frame 2 for a sphere. If Cutter finds any mistakes of this kind it will warn you and refuse to process the .key document. With three key frames the sample .key document could have defined three Tween'd segments.

    Tween "from" 1 "to" 2 "frames" 8
    Tween "from" 2 "to" 3 "frames" 8
    Tween "from" 3 "to" 1 "frames" 8

Changes from one key frame to the "next", be they height, coloration or anything else for that matter, would occur in a linear fashion ie. equal increments. Cutter also allows changes to occur more gracefully.


    Tween "from" 1 "to" 2 "frames" 16 "smooth"

For example, in the statement shown above the change in the height of the cone would be slow at first but would become more rapid around the 8th frame (50% of the way through the sequence). By frame 16 the rate of change would once again become "slow". By tween'ing from key frame 1 to 2 and then back to key frame 1 using smooth on both sequences the cone would have a slightly "bouncy" feel to its motion.

Tweening can be further controlled by the use of a technique called easing-in and easing-out - these are sometimes referred to as fairing-in and fairing-out. For example, the cone could be made to abruptly spring to its full height in the first sequence using the following statement,


    Tween "from" 1 "to" 2 "frames" 16 "easeout" 1.0

The second tween could convey the feeling the apex of the cone is falling as if it were under the influence of gravity ie. slow at first but becoming faster and faster,


    Tween "from" 2 "to" 1 "frames" 16 "easein" 1.0

In each case the number following "easein" and "easeout" may be set to any value between 0 and 1. A value of "easeout" 0.3, for example, would indicate that only the final 30% of the inbetweened frames would be eased-out ie. the rate of change would decrease to zero. Finally, it should be noted that easing-in and easing-out may, to a certain extent, be combined ie.


    Tween "from" 2 "to" 1 "frames" 100 "easein" 0.2 "easeout" 0.4

In this animation, 100 frames in length, only the first 20% and the last 40% of the sequence are effected by easing-in and easing-out. Cutter will not allow easing-in and easing-out to overlap. In other words if you attempt to set "easein" to 0.6 AND "easeout" to 0.7, Cutter will reduce the "easeout" period to 0.4, since 60% and 40% add up to 100%.


line

Animated Texture and Displacement Maps

Cutter is able to animate texture and displacement maps in the sense that key frames can specify two different image files for corresponding pairs of MakeTexture statements, for example,


Listing 4


Tween "from" 1 "to" 2 "frames" 25
KeyFrameBegin 1
    MakeTexture "myImage.tif.001" "myTex.tx" "periodic" "periodic" "gaussian" 2 2
    Projection "perspective" "fov" 45
    Translate 0 -0.2 2
    Rotate -110 1 0 0
    Rotate 70 0 0 1
    WorldBegin
        Surface "texmap" "texname" ["myTex.tx"] "maptype" 2
        Sphere 1 -1 1 360
    WorldEnd
KeyFrameEnd
KeyFrameBegin 2
    MakeTexture "myImage.tif.025" "myTex.tx" "periodic" "periodic" "gaussian" 2 2
    Projection "perspective" "fov" 45
    Translate 0 -0.2 2
    Rotate -110 1 0 0
    Rotate 70 0 0 1
    WorldBegin
        Surface "texmap" "texname" ["myTex.tx"] "maptype" 2
        Sphere 1 -1 1 360
    WorldEnd
KeyFrameEnd

The important point to notice here is that each of the multiple images files must have a 3 digit extension and that the number of frames specified in the Tween statement, 25 in the example shown above, matches the number of images files to be converted to texture files with the MakeTexture statement. All the image files (ie. myImage.001 to myImage.025) must be in the same folder as the rib file - Cutter cannot create missing files by morphing images.

Because texture files are generally quite large each frame of the animation uses the same name for the texture produced by MakeTexture ie. "myTex.tx" (any name can be used for the texture file). In this way, each frame over-writes the previously used texture file and thus saves disk space.


© 2002- Malcolm Kesson. All rights reserved.