RIS
Shading - Displacements


return to main index


Introduction

This tutorial shows how to apply a displacement to an object. It is assumed the reader has followed the instructions presented in the tutorial "RIS: Introduction to RIS Shading". The jack_scene.rib from that tutorial will be used in this demonstration.


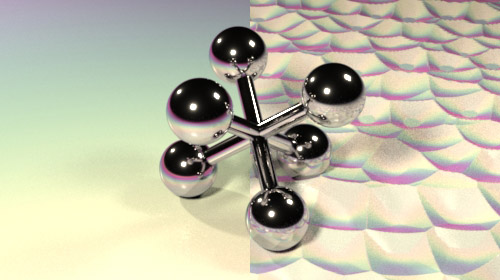
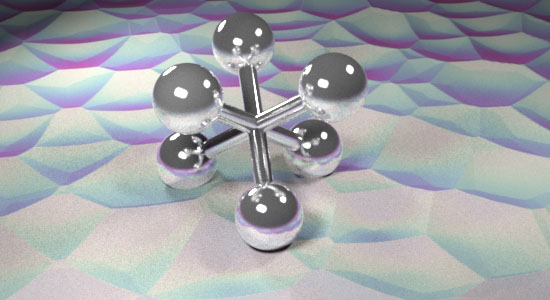
Figure 1 - with and without displacements


Step 1 - Create an Instance of PxrDisplace

Save an empty rib archive named Ridges.rib in the archives/materials directory.

    HOME_DIR
            |_/archives
                      |_/geo
                      |_/lights
                      |_/materials/
                                 |_ Ridges.rib

Open the archive document and choose Displacement->PxrDisplace from the Plugins menu.


Figure 2


Cutter will insert the following rib statements into the document.


Attribute "displacementbound" "float sphere" [1]
Displace "PxrDisplace" "PxrDisplace1"
        "int enabled" [1]
        "float dispAmount" [1.0]
        "float dispScalar" [0.0]
        "vector dispVector" [0.0 0.0 0.0]
        "vector modelDispVector" [0.0 0.0 0.0]


Step 2 - Assign an Input to the Displacement

Move the text cursor to the beginning of the document and choose PxrWorley from the Plugins->PxrPatterns menu.


Figure 3


The archive will now have the following rib statements.


Pattern "PxrWorley" "PxrWorley1"
        "int surfacePosition" [0]
        "float frequency" [4.0]
        "int distancemetric" [0]
        "float jitter" [0.75]
        "float c1" [0.8]
        "float c2" [-0.2]
        "float minkowskiExponent" [4.0]
        "int shape" [0]
        "int clamp" [1]
        "int invert" [0]
        "float randomScale" [0.]
        "float randomScaleCenter" [0.]
        # Examples manifold connection
        #"reference struct manifold" ["PxrManifold2D1:result"]
        #"reference struct manifold" ["PxrManifold3D1:result"]
  
        # "PxrWorley1:resultF"    uses->|float| 
        # "PxrWorley1:resultRGB"  uses->|color| 
    
Attribute "displacementbound" "float sphere" [1]
Displace "PxrDisplace" "PxrDisplace1"
        "int enabled" [1]
        "float dispAmount" [1.0]
        "float dispScalar" [0.0]
        "vector dispVector" [0.0 0.0 0.0]
        "vector modelDispVector" [0.0 0.0 0.0]

The PxrWorley "node" has a float output - as indicated by the comment.

    # "PxrWorley1:resultF"     uses->|float| 

This will be used to "drive" PxrDisplace's displacementScalar parameter.
Change,

    "float dispScalar" [0.0]
to
    "reference float dispScalar" ["PxrWorley1:resultF"]

Note the use the keyword reference.

Change the PxrWorley frequency from 4.0 to 30.0 and the dispAmount of PxrWorley from 1.0 to 0.5.


Step 3 - Using ReadArchive

At line 39 in jack_scene.rib add the following rib statement

    ReadArchive "materials/Ridges.rib"

Render the rib.


Figure 4


Accessing the Documentation for a Rib Statement

With the alt key down, double clicking on the name of a Pattern, Bxdf or any other rib statement will automatically open the Pixar documentation for the item.


© 2002- Malcolm Kesson. All rights reserved.