RIB
Depth Map Shadows


return to main index


Introduction

Shadows in real life are considered to be an integral part of scene - a natural outcome of the interplay of light and objects. Before the introduction of raytracing with release 11 of Pixar's prman, shadows were treated as additional elements that had to be prerendered (shadow pass) before the final render (beauty pass).

When illuminated by one of the basic light sources, surfaces are shaded according to the position and orientation of the light source and the orientation and optical characteristics of the surface itself. Although the classic light source shaders,

  • distantlight
  • pointlight, and
  • spotlight

cannot be used to render shadows, each of them has a counter-part,

  • shadowdistant
  • shadowpoint, and
  • shadowspot

that can cast shadows. For example, instead of using a basic spot light in a scene, such as

    LightSource "spotlight" 1 "intensity" 50 "from" [1 5 0] "to" [0 0 0]

its shadow casting equivalent could be used ie.

    LightSource "shadowspot" 1 "intensity" 50 "from" [1 5 0] "to" [0 0 0]
                              "shadowname" ["spot1.tx"]

Shadow casting is not an automatic attribute of every light source because the renderer is required to perform additional calculations in order to determine the effects of a shadow. This slows the rendering process and often it is not necessary for every light in a scene to cast a shadow.

Unlike raytracing, in which the shadows are automatically created along with every other element in an image, Pixar's prman, in its traditional scanline rendering mode, uses a shadow pass to create a depth map that contains data to be used during the beauty pass.

This method of creating shadows can be more efficient than ray-tracing. For example, if the lights and objects in a scene remain static during an animation the renderer need only perform the lengthy shadow calculations on the first frame - for subsequent frames the renderer can re-use the pre-calculated shadows.

Since the rendering of the shadow pass and beauty pass are completely separate, the renderer can be forced to use the wrong depth maps for the beauty pass. With some trickery a light source can appear to cast shadows around corners, or an object can be made to cast an inappropriate, but creatively more interesting shadow. Such manipulations are beyond the capabilities of renderers that rely solely on ray-tracing.


Prman

When using Pixar's mtor or Rfm Pro plugin with Maya, the rendering of depth-mapped shadows ie. shadow pass/beauty pass, can be fully automated. For the purposes of production, such automation is desirable. However, for the purposes of comprehension it is far better to deal directly with rib files. This tutorial assumes the reader is using the Cutter text editor to create their rib files. The reader can use Pixar's prman renderer, if they are lucky enough to have access to it, or they can use another commercial or free RenderMan complient renderer.

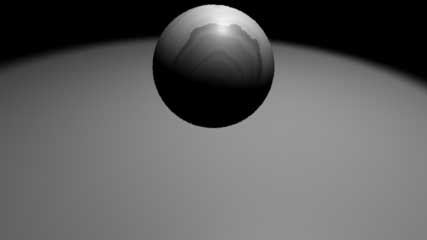
While Cutter eases the chore of rendering depth maps it is definitely not designed to shield you from the process of making a shadow pass. We will work with a simple scene consisting of a sphere and a square polygon lit by a spot light,


Listing 1


Display "shadow_demo" "framebuffer" "rgb"
Format 427 240 1
Projection "perspective" "fov" 40
ShadingRate 1
  
Translate  0 0 3
Rotate -30 1 0 0
Rotate 0   0 1 0
Scale 1 1 -1
  
WorldBegin
    LightSource "spotlight" 1 "intensity" 30 
                "from" [1 5 0] "to" [0 0 0]     
    AttributeBegin
        Translate 0 0.5 0
        Surface "wood" "Ks" 0.2
        Sphere 0.5 -0.5 0.5 360
    AttributeEnd    
    AttributeBegin
        Surface "plastic"
        Scale 12 12 12
        Polygon "P" [-0.5 0 -0.5   0.5 0 -0.5  
                      0.5 0 0.5  -0.5 0 0.5]
                "st" [0 0  1 0  1 1  0 1]
    AttributeEnd
WorldEnd


Figure 1


Step 1 - Insert a Shadow Spotlight

First we will replace the current spotlight shader with its shadow equivalent. Place the text cursor on the line before the LightSource statement and from the Shaders menu on the RmanTools palette select the light source shader "shadowspot" (figure 2).
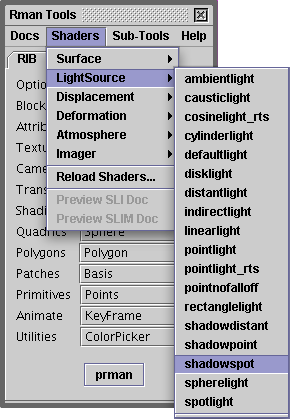


Figure 2


This will insert the following statement into the rib file. Comment the existing spotlight light source,

    LightSource "shadowspot" 1    
                "intensity" 1.0
                "lightcolor" [1.0 1.0 1.0]
                "from" [0.0 0.0 0.0]
                "to" [0.0 0.0 1.0]
                "coneangle" 0.523599
                "conedeltaangle" 0.087266
                "beamdistribution" 2.0
                "shadowname" ["spot1.tx"]
                "samples" 16.0
                "width" 1.0
    #LightSource "spotlight" 1 "intensity" 30 
    #                "from" [1 5 0] "to" [0 0 0]

To simplify the rib file, the shader parameters that will not be modified in this tutorial can be removed. The remaining parameters should be adjusted to match the original spotlight ie.

    LightSource "shadowspot" 1    
                "intensity" 30
                "from" [1 5 0]
                "to" [0 0 0]
                "shadowname" ["spot1.tx"]
                "samples" 16
                "width" 

Step 2 - Generate a Shadow rib File & Render the Shadow Pass

Cutter provides two ways of producing a shadow rib file. You can render the shadow directly by placing the text cursor anywhere in the name "spot1. tx" and then press the "prman" render button at the bottom of the Rman Tools palette (or use the keyboard shortcut alt+e, control+e or apple+e). Cutter will produce a shadow pass rib file and render it directly. Or, if you wish to see the shadow pass rib file before it is rendered, choose "Shadow Pass" from RmanTools menu (figure 3).
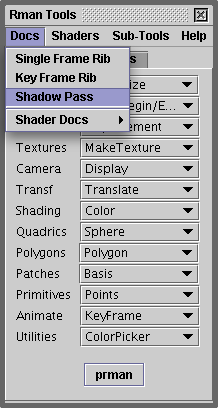

choose_shader
Figure 3


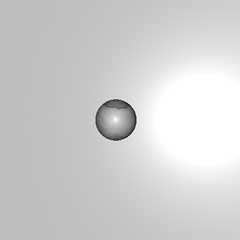
Cutter will open another document window into which it will copy the contents of the WorldBegin-WorldEnd block. The camera transformations for this new rib file are calculated so as to render an image as if the camera had been placed at the same location as the shadow spotlight.

The shadow rib file, excluding the contents of the world block, is shown below,


Listing 2


PixelSamples 1 1
PixelFilter "box" 1 1
Hider "hidden" "jitter" [0]
  
FrameBegin 1
Option "searchpath" "shader" "@:path to your shaders"
Option "searchpath" "texture" "path to your textures"
  
Display "spot1.depth" "zfile" "z"
#Uncomment this Display statement if you want to see an image
#Display "view_from_light" "framebuffer" "rgb"
Projection "perspective" "fov" 65
Format 512 512 1
ShadingRate 4
  
LightSource "distantlight" 1 "intensity" 1.5 "from" [0 0 0] 
            "to" [0 0 1]
  
Rotate -90.0 1 0 0
Rotate 11.309 0 0 1
Translate -1.0 -5.0 -0.0
WorldBegin
    ...
    ...
WorldEnd
MakeShadow "spot1.depth" "path to your textures/spot1.tx"
FrameEnd


view_from_light
Figure 4 (view from the light source)


The most important statements emphasised in bold font. In particular notice the renderer has been instructed to produce a zfile containing depth, or z, information. The final statement is responsible for converting the shadow depth map into a corresponding shadow texture.

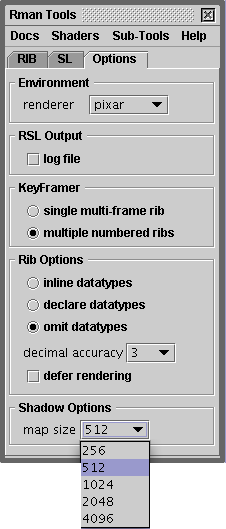
Shadow maps are required to be square and have a pixel dimension that is a power of 2 ie. 256x256, 512x512, 1024x1024, 2048x2048 etc. By default Cutter sets the size to 512x512 but this can be changed as shown below,


shadow_size
Figure 5


Step 3 - Render the Beauty Pass

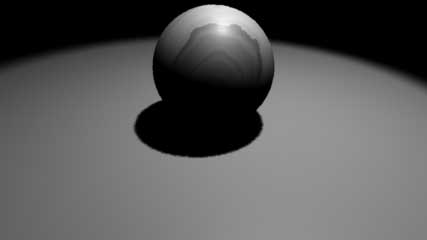
After the shadow pass has successfully rendered, using either of the two methods outlined in step 2, render the original rib file. If all has gone as planned you will see the image shown in figure 6,

shadowspot
Figure 6


The shadow can be softened by adjusting the "width" and "samples" parameters,


Figures 7 and 8

width16_16

     "samples" 16
      "width" 16

width16_64

     "samples" 64
      "width" 16


Other Considerations

Several of the parameters of the shadowspot shader can be adjusted without the necessity of generating a fresh shadow pass. The parameters shown in blue can be altered without rendering a new shadow map. However, if the parameters shown in red are adjusted then a new shadow rib file must be generated and rendered.

LightSource "shadowspot" 1    
                "intensity" 30.0
                "lightcolor" [1 1 1]
                "from" [1 5 0]
                "to" [0 0 0]
                "coneangle" 0.523599
                "conedeltaangle" 0.087266
                "beamdistribution" 2.0
                "shadowname" ["spot1.tx"]
                "samples" 16.0
                "width" 1.0

Cutter is limited in its ability to generate shadow rib files - currently only the shadowspot shader is supported.


© 2002- Malcolm Kesson. All rights reserved.