Cutter
Gettting Started with mental ray


return to main index


Introduction

The purpose of this tutorial is to demonstrate how Cutter is used to compile a shader and render a simple scene. Following the steps outlined in the tutorial will also enable the reader to check if they have set up Cutter so that it can use mental ray properly. The recently published reference book on the subject of shader writing is,
    Writing mental ray Shaders: A perceptual introduction
            by Andy Kopra.

Readers wishing to explore the art and science of shader writing should purchase Andy's book. Cutter takes care of many of the tasks that a shader writer would otherwise have to handle. The text editor is mental ray savvy and as such can greatly assist a person who wishes to learn how to write mental ray shaders.

The following notes assume the reader has read the tutorial "Cutter: Integration with mental ray" and has installed a version of mental ray as outlined in the tutorials, "mental ray: setup for CD vol I & II" and "mental ray: setup for CD vol III".


Creating a Custom Shader

Setp 1 - Using a Shader (MiC) Template

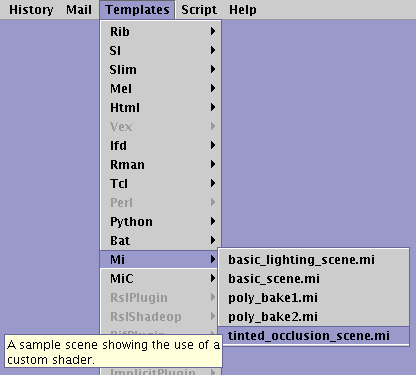
From Cutter's Templates menu choose "tinted_occlusion.c" - figure 1. Popups will appear as the user runs the mouse over the names of the templates.
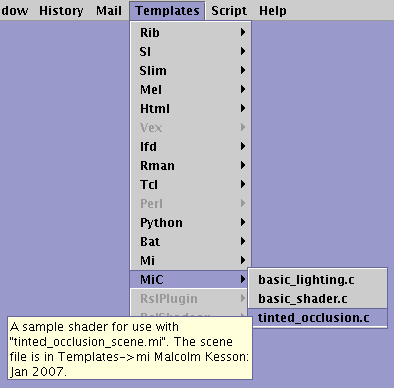

mi prefs
Figure 1

An untitled copy of the template file will open. The source code for the shader is shown below.


Listing 1 - tinted_occlusion.c


/*
A sample shader for use with "tinted_occlusion_scene.mi".
The scene file is in Templates->mi
Malcolm Kesson: Jan 2007
*/
#include "shader.h"
  
struct tinted_occlusion {
    miUint  samples;    /* default [16]     */
    miColor tint;       /* default [1 1 1]  */
};
DLLEXPORT
int tinted_occlusion_version(void) {return(1);}
  
DLLEXPORT
miBoolean tinted_occlusion(
    miColor *result,
    miState *state,
    struct  tinted_occlusion *params)
{
    miUint  samples = *mi_eval_integer(¶ms->samples);
    miColor *tint = mi_eval_color(¶ms->tint);
  
    miVector trace_direction;
    int object_hit = 0, sample_number = 0;
    double sample[3], hit_fraction, ambient_exposure;
  
    while (mi_sample(sample, &sample_number, state, 3, &samples)) {
        mi_reflection_dir_diffuse_x(&trace_direction, state, sample);
        if (mi_trace_probe(state, &trace_direction, &state->point))
            object_hit++;
        }
    hit_fraction = ((double)object_hit / (double)samples);
    ambient_exposure = 1.0 - hit_fraction;
    result->r = tint->r * ambient_exposure;
    result->g = tint->g * ambient_exposure;
    result->b = tint->b * ambient_exposure;
    
    result->a = 1.0;
    return miTRUE;
}


Setp 2 - Save the Shader Code

Save the file as "tinted_occlusion.c" in your "shader_src" directory ie.
        M:\mi\shader_src     (Windows) or,
        /users/USER_NAME/mi/shader_src     (Linux) or,
        /users/Documents/mi/shader_src     (MacOSX).
Refer to the tutorial "mental ray: Cutter Preferences" for information about the "shader_src" and "shaders" directories.


Setp 3 - Compiling & Linking

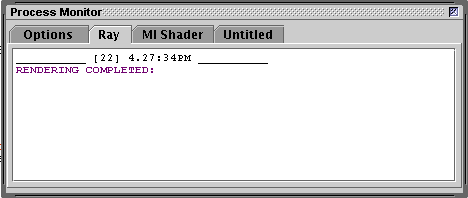
Compile and link the shader using the (execute) keyboard shortcut Alt + e, or Control + e, or Apple + e. Cutter's Process Monitor window will show any information, warning or error messages issued by the compiler - figure 2.
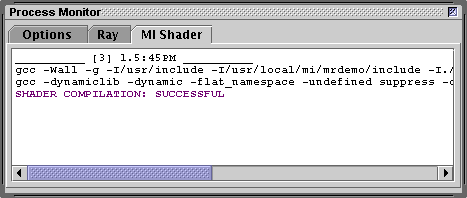

mi prefs
Figure 2

To see the command used by Cutter, as a result of using the keyboard shortcut, select the "Options" tab - figure 3. Cutter generates and runs a makefile (or VS8 bat file) for each shader the user compiles. Under most circumstances it will not be necessary for a user to write their own makefiles or VS8 bat files. The compiled shader will be saved in the directory specified in Cutter's preferences - refer to the tutorial "mental ray: Cutter Preferences".
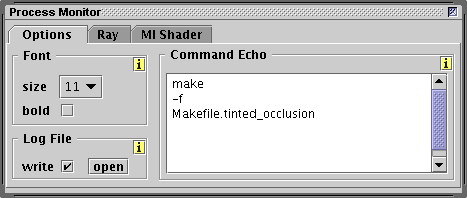

mi prefs
Figure 3


In the "background" Cutter writes and saves a shader .mi (listing 2) file. A copy of the file is also saved in the users "shaders" directory.


Listing 2 - tinted_occlusion.mi (generated by Cutter)


# Generated by Cutter version 5.5.0 [10.9.2008 at 1:8:57]
# This document is automatically updated each time the source
# 'C' language file
#     "/Users/malcolm/Documents/mi/shader_src/tinted_occlusion.c"
# that implements this shader is compiled. Cutter will ignore
# this document if the first commented line of text does not
# begin with "Generated by Cutter"
  
declare shader
    color "tinted_occlusion" (
        integer "samples",    #: min 0 max 1 default 16   # default
        color "tint"          #: default 1 1 1   # default
        )
    version 1
    # The apply tag is ignored by mental ray. Its used only as
    # a gui hint to the application that uses the shader.
    apply material
end declare

In particular, note the values within the square brackets of the comments of tinted_occlusion.c.

    miUint  samples;    /* default [16]     */
    miColor tint;       /* default [1 1 1]  */

They have been used by Cutter as default values within tinted_occlusion.mi.

    integer "samples",    #: min 0 max 1 default 16   # default
    color "tint"          #: default 1 1 1   # default

Specifying values, within square brackets, in the shader source code file is a very convenient way of controlling the defaults in the .mi file.


Rendering a Simple Scene

Setp 1 - Using a Scene (Mi) Template

The next template demonstrates how the tinted_occlusion shader is referenced and used by a .mi scene file. Choose "tinted_occlusion_scene.mi" from the Templates menu - figure 4.


mi prefs
Figure 4


Setp 2 - Save the Scene

Save the file as "tinted_occlusion_scene.mi" in your "scenes" directory ie.
        M:\mi\scenes     (Windows) or,
        /users/USER_NAME/mi/scenes     (Linux) or,
        /users/Documents/mi/scenes     (MacOSX).


Setp 3 - Render the Scene

The keyboard shortcut used to compile a shader also renders a scene file. The Process Monitor will display messages issued by mental ray - figure 5. Cutter's RayView tool, figure 6, will display the image as it is being rendered by mental ray.


mi prefs
Figure 5


mi prefs
Figure 6


Shader Writing Workflow

When writing a shader it is generally best to have not only its 'C' language source code file open but also a .mi scene file (not to be confused with a .mi shader file) that references the shader. After making a change to the shader code, use the keyboard shortcut, alt + e, control + e or Apple + e, to compile and link a "fresh" version of the shader. Use the same keyboard shortcut to render the scene file. This edit-compile-render loop, all done from within Cutter, is the fastest way to develop/experiment with a shader. Of course, once the initial development work has been completed the shader should be tested thoroughly in Maya.

The Transforms Tool

The mental images scene description protocol does not have individual transformation commands, such as Rotate, Translate and Scale. Instead, transforms must be specified directly using a 4 x 4 transformation matrix. This makes it very difficult for a user to adjust the placement and orientation of the camera, or other "objects" in the scene. To overcome the horrors of trying to adjust transformation matrices, Cutter provides users with a floating palette, called the Transforms Tool (figure 7). It is available from the Tools menu.


mi prefs
Figure 7


With the text cursor placed in the transform statement of the camera, a right mouse click within the Transformations panel will raise a popup menu. Choosing the first item, Get From Comments will cause Cutter to "populate" the text fields within the panel with their human-friendly values. Specific transformations can be altered, after which pressing the Apply button will update the human-unfriendly transformation matrix in the scene file. The transformations panel has been deliberately layed-out to mimic the information found in the transform nodes of Maya.

The first time a scene file is used to test a shader the reader will be shown the following notification. Naming the output image so that it matches the name of the shader being edited, triggers Cutter to include additional information in a HTML catalog. Refer to the tutorial, "Cutter: Integration with mental ray", for more information.


mi prefs
Figure 8


Some Common Errors

If the renderer reports these errors,

    LINK 0.0  error  191014: tinted_occlusion.so: load failed
    MI   0.0  error  121417: tinted_occlusion_scene.mi, 
        line 8: cannot find $include file "tinted_occlusion.mi"

it most likely because one or more paths in the readers custom rayrc file is incorrect - refer to the tutorial "mental ray: Setup for CD vol III".

If the renderer reports the error shown below it is because it cannot obtain a license. This happens on MacOSX after the computer has been put into "sleep" mode.


    __________ [1] 2.59:4PM __________
    WARNING (/usr/local/mi/mrdemo/bin/ray): Can't connect to 127.0.0.1 
    ("mi-spm"[tcp/7050]) (61: Connection refused)
    WARNING (/usr/local/mi/mrdemo/bin/ray): spmhost0() 
    ("mi-spm"[tcp/7050]) does not respond
    WARNING (/usr/local/mi/mrdemo/bin/ray): spmhost1 is an unknown host
    WARNING (/usr/local/mi/mrdemo/bin/ray): spmhost2 is an unknown host
    WARNING (/usr/local/mi/mrdemo/bin/ray): spmhost3 is an unknown host
    WARNING (/usr/local/mi/mrdemo/bin/ray): spmhost4 is an unknown host
    WARNING (/usr/local/mi/mrdemo/bin/ray): spmhost5 is an unknown host
    WARNING (/usr/local/mi/mrdemo/bin/ray): spmhost6 is an unknown host
    WARNING (/usr/local/mi/mrdemo/bin/ray): spmhost7 is an unknown host
    WARNING (/usr/local/mi/mrdemo/bin/ray): spmhost8 is an unknown host
    WARNING (/usr/local/mi/mrdemo/bin/ray): spmhost9 is an unknown host
    FATAL ERROR (/usr/local/mi/mrdemo/bin/ray) at 10/14/2008 14:59:33 :
         Can't connect to any SPM license server.
    RENDERING COMPLETED: UNSUCCESSFULL
        Errors: 5
        Warnings: 15

To restart the spm license server, open a terminal and enter these commands.

    % sudo -s
     (enter the admin password, then enter)
    % /var/spm/spmd_ib

The status of the server can be querried using this command.

    % /var/spm/spmstat


© 2002- Malcolm Kesson. All rights reserved.