RifPlugin
Baking Hair/Fur/Grass


return to main index


Downloads

    RifPlugin BakeCurves.cpp source code.


Introduction

The RenderMan_for_Maya plugin outputs Maya hair, fur and grass as curves. The data for each "patch" of fur is saved as a binary file stored within a zipped rib; a so-called rib-in-.zip file. Fur data files are often very large and, as a consequence, when a frame is re-rendered the "cost" of generating the same data is repeatedly incurred. Unlike other geometries, hair, fur and grass cannot be exported as a pre-baked rib neither can a rib archive node be used to write a curves archive.

This tutorial presents a C++ rif, called BakeCurves, that enables hair, fur and grasses to be written as archive rib files. In broad terms the workflow consists of two phases.

Phase 1 - baking pass

The rif is activated and a frame or range of frames are rendered.


Phase 2 - beauty pass

After the rib archives have been generated the original geometry is hidden and a rib archive node is used to reference the archives.


Step 1 - Referencing the Rif Plugin in Maya

1.1     Set the project directory and open the Maya scene that uses hair, fur or grass.
1.2     Open Render Settings and choose the "Advanced" tab.
          Select the "Ri Filters" panel and click "Enable Rifs".
          Browse for the "Rif Plugin" and set the path for "Rif Args".


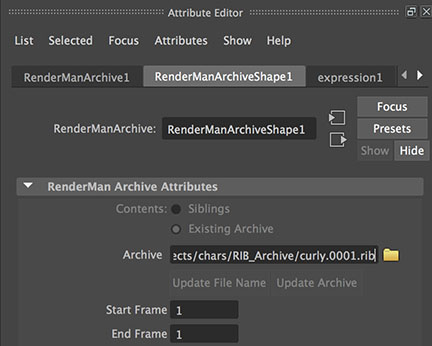
The "Rif Args" should provide the name of the directory in which the baked curves will be saved, for example,
    RIB_Archive
If the directory does not exist it will be created by the rif.


Step 2 - Baking the Fur

2.1     Render a single frame. For speed the hair, fur or grass elements in the scene will not appear in the rendered image but their rib archives will be generated. For example, in the case of a project named "chars" and a scene named "curly" with two objects named "BraidsShort1:hairAll" and "Tsubuichi:hairAll" the archive ribs written by the rif would be,

    maya/projects/chars/RIB_Archive/
                                   |_curly.0001.rib
                                   |_curly_ribs/0001/
                                                   |_BraidsShort1_pfxHairShape1_1.0001.rib
                                                   |_Tsubuichi_pfxHairShape1_1.0001.rib

The rib shown above in blue is an archive that will be used in step 3. In the case of "curly.0001.rib" it would have the following rib statement.


##RenderMan RIB
#bbox: -3.67499 -3.41063 -4.82254 3.80517 5.04039 1.29978
version 3.04
ReadArchive "RIB_Archive/bake_hair_ribs/0009/BraidsShort1_pfxHairShape1_1.0009.rib" 
ReadArchive "RIB_Archive/bake_hair_ribs/0009/Tsubuichi_pfxHairShape1_1.0009.rib" 


Step 3 - Using a Rib Archive

This step demonstrates how the curly.0001.rib archive would be used.
3.1     Go to Render Settings and uncheck "Enable Rifs".
3.2     Hide the hair, fur or grass geometries (Control + H).
3.4     Make sure nothing is selected then choose,
          RenderMan->Rib Archives->Create Node.
3.5     Use the browse button to locate curly.0001.rib.


The rendering of the scene should now be much faster because of the use of the pre-baked ribs.


Step 4 - Assigning a Material

4.1     Select the RenderManArchive1 node and choose "Add Custom Shading Group".


4.2     Right-mouse click in the text field and choose an existing material.


Although the root and tip colors have been baked into the curves archive files further look-dev and now occur using the material assigned to the custom shading group.

Finally, render the scene.


© 2002- Malcolm Kesson. All rights reserved.