RfM 21
|
Introduction
The instructions on this page have been extensively altered to match the features
of version 21 of Pixar's RenderMan. Additional instructions have been added
(3rd Sept. 2018) because of an "undocumented-feature" relating to passing of
values of environment variables set by the Maya.env file to the RenderManForMaya
plugin.
Step 1Download customize_rfm.zip and unzip its contents - as shown on the right. Step 2 - Maya.envMove the Maya.env file to, Windows
C:\Users\YOUR_NAME\Documents\maya\2017\Maya.env
Linux
/home/YOUR_NAME/maya/2017/Maya.env
MacOSX
/Users/YOUR_NAME/Library/Preferences/Autodesk/maya/2017/Maya.env
Additional Instructions for Windows Maya2018
The first two environment variables (lines 12 and 18) in the Maya.env file must be deleted.
Both MacOSX UsersReaders who are using MacOSX must edit the Maya.env so that it looks like this edited version. Step 3 - Custom Mel Scripts
Move the 9 mel scripts from the directory named "scripts" to your C:\Users\YOUR_NAME\Documents\maya\projects\scripts\
|_ addColorAttr.mel
|_ addFloatAttr.mel
|_ addStringAttr.mel
|_ aimY.mel
|_ getNormals.mel
|_ getParticleData.mel
|_ getVertices.mel
|_ maya_proj_utils.py
|_ userSetup.mel
The most important script is the one named userSetup.mel. It sets up the python environment used by several custom scripts. MacOSX UsersBecause the Maya.ini script (step 2) adds a path to the users maya/scripts directory you can create a scripts folder in your Documents/maya directory. In this way general purpose .mel and .py scripts can be conventiently stored the Documents/maya/scripts folder rather than in the (hidden) Library/Preferences/Autodesk/maya/2017/scripts folder. Step 4
Move the seven directories that begin with the prefix " C:\Users\YOUR_NAME\Documents\maya\projects\
|_ RfM_ini
|_ RfM_it
|_ RfM_mel
|_ RfM_osl
|_ RfM_python
|_ RfM_rif
|_ RfM_ris
|_ RfM_tcl
Step 5 - Custom Pattern Nodes (OPTIONAL)
From the |
Downloads/customize_rfm/
                       |_ Maya.env
                       |
                       |_ RfM_ini/
                       |         RMS.ini
                       |         RMS.scheme
                       |         RMSWorkspace.ini
                       |         RenderMan_for_Maya.ini
                       |         it.ini
                       |
                       |_ RfM_it/
                       |        EmailImage.py
                       |        Histogram.py
                       |        SaveAll.py
                       |
                       |_ RfM_mel/
                       |        addConstColorPrimVar.mel
                       |        addConstFloatPrimVar.mel
                       |        addFaceColorPrimVar.mel
                       |        addFaceFloatPrimVar.mel
                       |        addVertexColorPrimVar.mel
                       |        addVertexFloatPrimVar.mel
                       |        batchRenderRI.mel
                       |
                       |_ RfM_osl/
                       |         src/
                       |             FaceColor.osl
                       |         FaceColor.oso
                       |
                       |_ RfM_python/
                       |        batchdatabase.py
                       |        batchrender.py
                       |        batchrif.py
                       |        rif_it.py
                       |
                       |_ RfM_rif/
                       |        ShadingRate.cpp
                       |
                       |_ RfM_ris/
                       |        Args/
                       |            CutrBBones.args
                       |            CutrColorByHeight.args
                       |            CutrFaceColor.args
                       |            CutrPaperCup.args
                       |            CutrSideMask.args
                       |            CutrSparky.args
                       |            CutrVelvet.args
                       |        CutrBBones.cpp
                       |        CutrColorByHeight.cpp
                       |        CutrFaceColor.cpp
                       |        CutrPaperCup.cpp
                       |        CutrSideMask.cpp
                       |        CutrSparky.cpp
                       |        CutrVelvet.cpp
                       |
                       |_ RfM_tcl/
                       |         ChainUtils.tcl
                       |         VectorUtils.tcl
                       |
                       |_ scripts/
                                addColorAttr.mel
                                addFloatAttr.mel
                                addStringAttr.mel
                                aimY.mel
                                getNormals.mel
                                getParticleData.mel
                                getVertices.mel
                                maya_proj_utils.py
                                userSetup.mel
|
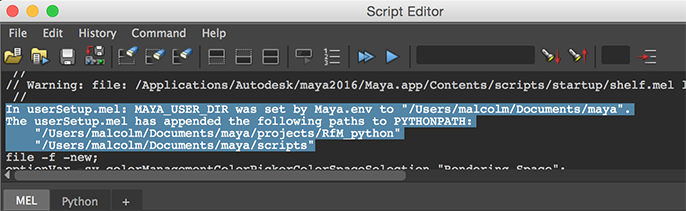
Trouble ShootingOpen Maya's script editor and scroll to the top of it's history text panel. Look for the lines of text similar to those shown below in blue. |
|
|
|
If the path for MAYA_USER_DIR=$HOME/Documents/maya
to,
MAYA_USER_DIR=D:/Users/YOUR_USER_NAME/Documents/maya
Drive "D" is shown above merely as an example. Make sure it matches your actual drive letter.
Notice the use of forward slashes - even on Windows. Save any changes that you make to the
|
© 2002- Malcolm Kesson. All rights reserved.