RfM 22
Batch Rendering and Filtering


return to main index


Topics:

   Batch Rendering - no rifs
   Using Python Filters
   Using Compiled C++ RifPlugin Filters


Introduction

This tutorial introduces a technique of batch rendering a sequence of frames without using Tractor or the batch render menu. It is assumed the reader has followed the suggestions in the tutorial RfM 23: Customizing and has downloaded and installed the customization scripts.

Unlike Tractor and RfM's batch render the technique shown here enables rif filters, written in python and compiled C++ RifPlugins to be applied to a sequence of rib files.


Custom Batch Render Workflow

1    Set the Maya project directory.
2    Save the Maya scene.
3    In Render Settings:
      - set the start and end frames,
      - set name.#.ext (Frame/Animation ext:),
      - set 4 digits of padding,
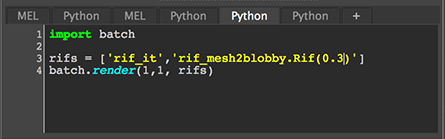
4    In the script editor (python tab) execute the following command,
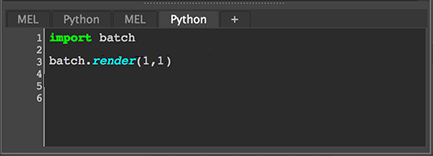


Figure 1


About the batch.render() Command

The first arg:
    1 for rib generation ON ie. render a "fresh" rib sequence.
    0 for rib generation OFF ie. rerender an existing rib sequence.
The second arg:
    1 for immediate rendering.
    0 for postponed rendering.

When the batch.render() python command is executed it generates and saves a script in the current Maya project directory. The script has the same name as the scene followed by two numbers that indicate the start and end frames. For example, if the scene is called "butterfly" with, say, a 50 frames sequence the script would be named,
    batchrender_butterfly_1_50.bat (Windows) or
    batchrender_butterfly_1_50 (Linux and MacOSX).
Part of a typical (MacOSX) script is shown below.


export RMANTREE=/Applications/Pixar/RenderManProServer-22.0
export MAYA_USER_DIR=/Users/malcolmkesson/Documents/maya
unset LD_LIBRARY_PATH 
"PATH_TO_PRMAN_EXE" -cwd "PATH_TO_CURRENT_PROJECT_DIR" -t:all -progress "PATH_TO_CURRENT_PROJECT_RIBS_DIR/perspShape.0001.rib"
"PATH_TO_PRMAN_EXE" -cwd "PATH_TO_CURRENT_PROJECT_DIR" -t:all -progress "PATH_TO_CURRENT_PROJECT_RIBS_DIR/perspShape.0002.rib"
"PATH_TO_PRMAN_EXE" -cwd "PATH_TO_CURRENT_PROJECT_DIR" -t:all -progress "PATH_TO_CURRENT_PROJECT_RIBS_DIR/perspShape.0003.rib"
ditto...


If the value of the second arg is 1 ie.
    batch.render(1,1)
the script is automatically executed in a cmd window (Windows) or a terminal (Linux and OSX). If the vale of the second arg is 0 ie.
    batch.render(1,0)
the user must manually execute the script by double clicking it.


Using Python Filters

The contents of the rib files produced by RfM and be altered using filters written in python.


Figure 2


One such filter, implemented by a script named rif_it.py, is part of the zip package mentioned in the RfM 23: Customizing tutorial. The rif_it module changes the Display statement in each rib file so that instead of rendered images being saved as openexr files they are displayed directly in the Image Tool. For example, to apply the filter execute the following command.


Figure 3


Multiple rifs can be used. For example, rif_mesh2blobby.py convert all polygonal objects to blobbies if they have been assigned a float primvar named "blobby" - figure 5.


Figure 4


Figure 5 (rollover)


Using Compiled C++ RifPlugin Filters

Up to the release of RfM 22 it was possible to specify RifPlugins using a convenient interface that was part of Maya's Render Settings window - figure 6. RfM 22 does enable rifs to be used directly - hence the motivation for the python scripts mentioned and presented in the tutorial RfM 23: Customizing.


Figure 6 - Not available in RfM 22


An example of using two RifPlugins is shown next. Note that if a RifPlugin accepts two or more inputs they must be separated by white space NOT by commas.


Figure 7


Figure 8
A polygonal torus undergoing a squash deformation.
It's edges have been replaced by thin RiCurves and
it's vertices have been used to define a RiBlobby.    


© 2002- Malcolm Kesson. All rights reserved.