RfM
RiMel - particleCurves


return to main index

Download:
    scripts.zip


Introduction

This page presents four scripts that enable the trajectories of particles to be baked as RenderMan curves - figure 1.


Figure 1


An interface shown in figure 2 offers a convenient way of controlling the attributes of the RiCurves that are written to disk.


Figure 2


Step 1

Download and unzip the scripts.zip file. Copy the following three scripts to your maya/projects/RfM_mel directory. Refer to the tutorial "RfM: Customizing" for information about this directory.

    maya/projects/RfM_mel/
                         |_ particleCurves.rman
                         |_ particleCurvesUI.mel
                         |_ particleCurvesRI.mel

Copy the general purpose python script to your maya/scripts directory. Ignore the script if you already have it.

    maya/scripts/
                |_ maya_proj_utils.py

Copy the specialized RenderMan python script to your maya/projects/RfM_python directory.

    maya/projects/RfM_python/
                            |_ particle_curves.py

Step 2 - Add the UI

Create a particle emitter and generate a few particles. Select the particles and run the following command in the script editor (mel tab).
        particleCurvesUI;
The interface shown in figure 2 should appear at the bottom of the shape node tab.


Step 3 - Generate the Rib Archives

In the Render Settings "Common" tab set a frame range, say, 1 to 50. This step does not require any images to be rendered. Instead, the following command, executed in the script editor (mel tab),
        rman genrib;
will scrub the timeline and "trigger" the particle_curves.py script to write 50 rib archive files each containing one or more RenderMan curves. Note the first few ribs may be empty. The ribs will be automatically saved in the projects RIB_Archive directory. For example,


    PROJECT_DIR/RIB_Archive/SCENE_NAME/PARTICLE_NAME/
                                                    |_ PARTICLE_NAME.0001.rib
                                                    |_ PARTICLE_NAME.0002.rib
                                                    |_ ditto

Step 4 - Using the Rib Archives

The sequence of rib archive files can be rendered using a RenderMan Rib Archive Node - figure 3.


Figure 3


However, before creating the node make sure there are no selections in the outliner. In figure 4 note the numeric extension has been changed to $F4 and the "End Frame" has been set to number of ribs generated in step 3.


Figure 4


Step 5 - Shading and Rendering

Materials cannot be assigned directly to an archive shape node. Instead, a custom shading group must be added to the archive transform node - figure 5.


Figure 5


Right mouse button click in the "Custom Shading Group" text field and select an existing RIS material.


Figure 6


The scene is now ready for rendering - either a single image or an animation.


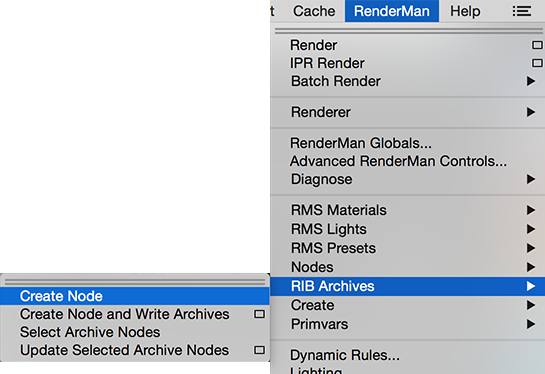
About the Rib Archives

A typical rib archive written by the particle_curves.py script is shown below.


#bbox: -2.7820 3.5284 -3.4351 -1.4740 4.3510 -1.7830 
AttributeBegin
Attribute "dice" "hair" [1]
Basis "catmull-rom" 1 "catmull-rom" 1
Attribute "user" "float probability" [0.8444]
Curves "cubic" [6] "nonperiodic" "P" [
-2.782 4.229 -2.376
-2.782 4.229 -2.376
-2.555 3.981 -2.758
-2.329 3.735 -3.130
-2.143 3.528 -3.435
-2.143 3.528 -3.435]
"width" [
0.0200
0.0200
0.0200
0.0200
]
AttributeEnd

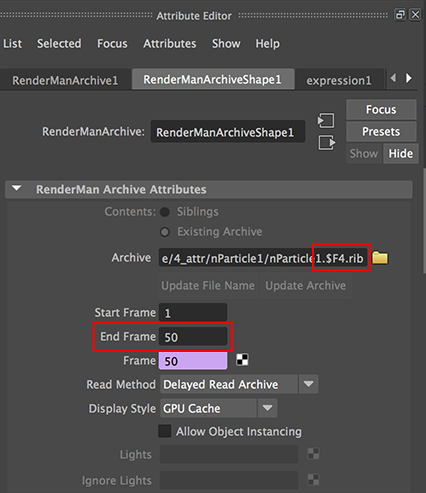
The bounding box information, written as a comment, is used by the RenderMan archive node to draw a wire frame box in the Maya viewport. The python script 
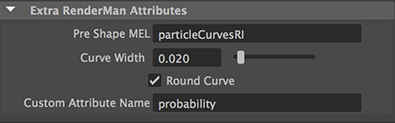
adds a custom user attribute that assigns a random number in the range 0 to 1. This value can be used for specialized shading. The tutorial "RixPatterns: Stocastic Culling" demonstrates one possible use of the "probability" value that is assigned to each curve.


© 2002- Malcolm Kesson. All rights reserved.