Using the Vertex Data to Place a "Cluster" of Points
Select both polymesh surfaces in Maya and execute the following MEL procedure in the Add_Primvar tab of the script editor.
addFloatPrimVar("render_mode", 1);
Save the following script shown in listing 5 as rif_mesh_geo5.py and edit the Rif_Py tab - as shown below.
Note the use of the rif_mesh_geo5.Rif(200, 0.3, 0.02).
import batch
import rif_mesh_geo5
reload(rif_mesh_geo5)
rifs = ['rif_it','rif_mesh_geo5.Rif(250, 0.3, 0.02)' ]
batch.render(1,1, rifs)
Listing 5 - rif_mesh_geo5.py
import prman
from rif_utilities import MeshDB
from rif_utilities import getFloatPrimvar
from rif_utilities import genPointsAroundVertex
class Rif(prman.Rif):
    MESH = 0
    POINTS = 1
    POINTS_AND_MESH = 2
    DEFAULT_MODE = MESH

    def __init__(self, ri, num, rad, width):
        prman.Rif.__init__(self, ri)
        self.num = num      # number of points clustered per vertex
        self.rad = rad      # radius of each cluster
        self.width = width  # the size of the points in each cluster

    def PointsGeneralPolygons(self, nloops, nverts, verts, params):
        ##___________________________________
        render_mode = int(getFloatPrimvar('render_mode', params, Rif.DEFAULT_MODE))
        if render_mode == Rif.MESH:
            self.m_ri.PointsGeneralPolygons(nloops, nverts, verts, params)
            return
        mesh = MeshDB(nloops, nverts, verts, params)
        vertices = mesh.getVertices()
        vert_counter = 0
        for vert in vertices:
            extra_points = genPointsAroundVertex(self.num, vert, self.rad, vert_counter)
            points_params = {
                         prman.Ri.P : extra_points,
                         prman.Ri.CONSTANTWIDTH : self.width
                        }
            self.m_ri.Points(points_params)
            vert_counter += 1

        if render_mode == Rif.POINTS_AND_MESH:
            self.m_ri.PointsGeneralPolygons(nloops, nverts, verts, params)
         ##___________________________________
|
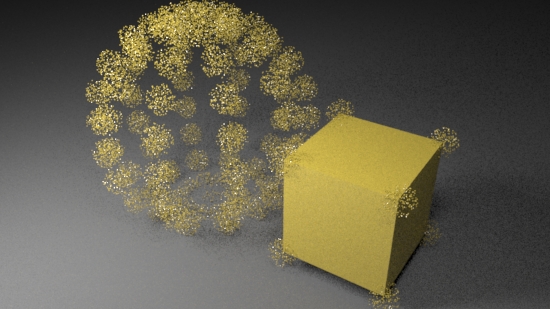
Using the new rif should produce an image similar to figure 5.

Figure 5

