The User Interface
The code that implements the user interface (UI) and RenderMan Interface (RI)
components are contained in the following three scripts that are in the
cloudy.zip download.
mesh2CloudUI.rman
mesh2CloudUI.mel
mesh2CloudRI.mel
They should be saved in the readers RfM_mel directory - as explained in the tutorial,
"RfM: Customizing".
The mesh2CloudUI.rman script defines the interface shown below.
The "Pre Shape MEL" text field references the main proc in the mesh2CloudRI.mel script
and as such its text should not be edited.
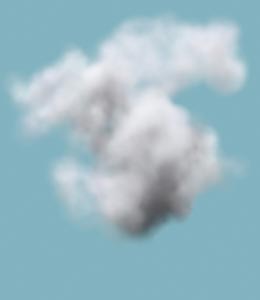
The "Blobby Size" slider controls the radius of the individual blobs. Its value
will largely depend on the scale of the polymesh that defines the distribution of the blobs.
The "Height Offset" slider controls the vertical offset of each blob. When set to 1.0 the
blobs are at their "true" position; when set to 0.0 their Y coordinates will be set to zero. This
slider controls the extent to which a cloud callapses onto itself.
The "Jitter"
slider applies a random XYZ offset to the vertex positions that define the locations of
the blobs.
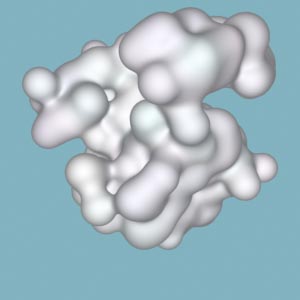
The "Previs" checkbox enables the Blobby to be rendered as a non-volume primitive
using prman's defaultsurface shader. The checkbox temporarily overrides the
"Convert to Volume" option.
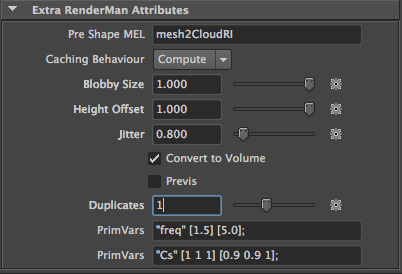
Figure 6
The "Duplicates" slider will cause duplicate rib archives that define the Blobby to be rendered -
a fairly useful, albeit expensive, way of increasing the density of the final cloud.
Shading Controls
The "PrimVars" text fields accepts the names and values of primvars.
The sample shader given below has three parameters that
can be controlled by primvars, namely, "Kd", "freq" and "falloff". The shader also responds
to the primitive variables "Cs" and "Os".
Listing 4 (cloudy.sl)
|
surface
cloudy( float   Kd = 1;
        float   noiseFreq = 2;
        float   noiseContrast = 1.2;
        float   opacityContrast = 1.5;
        string  noiseSpace = "shader")
{
point pp = transform(noiseSpace, P);
float ns = noise(pp  * noiseFreq);
ns += (noise( pp * noiseFreq * 2) - 0.5) * 0.5;
ns += (noise( pp * noiseFreq * 4) - 0.5) * 0.3333;
ns = pow(ns, noiseContrast);

// Using VolumeField is only meaningful with a Blobby.
// It allows the shader to ramp down the opacity near
// to the edge of the primitive.
color c = 0;
illuminance(P) {
    c += Cl;
    }
float grayscale = (c[0] + c[1] + c[2]) * 0.3333;

grayscale = pow(grayscale, opacityContrast);
Oi = VolumeField * ns * Os * grayscale;
Ci = Oi * Cs * Kd;
// optionally we could use the light color
// Ci = Oi * Cs * c * Kd;
}
|
The values of the primvars can be specified singularly or as a range.
For example, if the polymesh has 50 vertices the Blobby will have the corresponding number of
"blobs". The following text
"Cs" [1 1 1];
will repeat the sequence of rgb values 50 times, one for each blob. However, if
this text is used
"Cs" [1 1 1] [.9 .9 0.8];
then a sequence of randomized red and green values in the range red 0.9 to 1.0,
and blue values in the range 0.8 to 1.0, will be specified for the primvar. Lists of
primvars must be separated by semi-colons (";"). The open and close brackets for the
primvar values are optional.
Primvars can
help to create more visually interesting clouds. For a basic introduction to primvars
refer to the tutorial
"RIB/RSL: Introduction to Primvars".
|