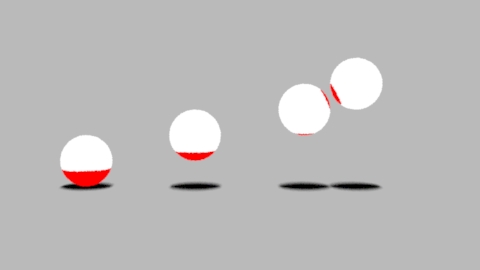
Figure 3
In the case of concave objects the rays traced from one part of an object may hit another part of the same object - figure 4.
RSL
|
IntroductionThis tutorial demonstrates how to change the color of an object based on its proximity to another surface - figure 1. It also presents a solution to the more challenging problem of how to ensure the color change, caused by a collision with another object, "sticks" to an object after it has moved away from the surface that caused the collision - figure 2. |
|
|
|
|
|
Coloration by Proximity
The ColorByProximity shader, listing 1, uses the |
|
Listing 1 - ColorByProximity.sl
|
|
If the intention is to only test distances from, say, the sphere to the floor plane
then using |
|
In the case of concave objects the rays traced from one part of an object may hit another part of the same object - figure 4.
|
|
|
|
|
In rib files generated by Pixar's RenderMan Studio each surface in a scene is "tagged" with a custom "id" attribute. For example, Attribute "identifier" "float id" [4]
ReadArchive "dented_sphere.rib"
To avoid erroneous self ray-hits (figure 5) a shader can compare the "id" of the micro-polygon
being shaded with the surface "id" hit by a ray traced by the |
|
Listing 2 - ColorByProximity.sl (version 2)
|
Collisions & Retained ColorTo shade objects so that they uniformly, and persistently, change color as a result of collisions, figure 6, a shader must retain ("remember") the results of proximity tests that it previously performed during an animation. Another requirement of a collision shader is that it must be able, as a single instance, to shade an arbitrary number of objects according to each ones retained collision "status".
Thanks for the Memory
The technique used by the collision shader in listing 3 relies on the use of a pointcloud
as an accumulation buffer. Refer to the tutorial, All for One and One for All
Ideally, each of the mirco-polygons of an object should be able to read and write
a collision value to a single shared location in a pointcloud. Unfortunately, micro-polygona must
write data to different locations. To overcome this limitation the ColorByCollision shader writes
a micro-polygons collision data to a location within a cluster of spatially close randomized points. Each object
to which the shader is assigned has its own specific cluster of locations.
|
|
|
|
Listing 3 - ColorByCollision.sl
|
Preparation and Use of a Header File
Having tested the shader its "core" code can be wrapped in a RSL function and saved to a header (.h)
file. For example, listing 4 implementes a function named ColorByCollision
saved in a header file named Collision.h. The header file is referenced by the simplied version
of the original shader - listing 5. The principle difference between the shader code and the function code is that
the inputs (parameters) of a shader always have default values. Some extra code, shown in bold, has
been added to the function. The extra code ensures the function only performs calculations for "camera"
rays.
|
|
Listing 4 - Collision.h
|
|
Listing 5 - ColorByCollision.sl (version 2)
|
© 2002- Malcolm Kesson. All rights reserved.