RfM Reyes
Custom ColorByCollision Node


return to main index

Links:
    RSL: Color By Collision tutorial
    HyperShade cutrColorByCollision.h node script


Introduction

This tutorial extends the shading technique introduced in the tutorial RSL: Color By Collision to the implementation of a custom hypershade node. The node detects collisions and outputs a color that can, for example, be wired into the "Surface Color" input of RMSGPSurface or RMSMatte. An example animation is shown below. This tutorial is in two parts. First, it outlines how to install, register and use the cutrColorByCollision.h node script. Secondly, it provides an overview of how the code for the node was developed.


Installation & Registration

It is assumed the reader has customized the scripting environment of RenderMan Studio by following the suggestions in the RfM: Customizing tutorial.

Download the cutrColorByCollision.h script and move it to the following directory,
    maya/projects/RfM_hypershade

Two lines of code in the script must edited. Change the nodeid (line 11) to a unique value greater than 1053500. Its current value of 1053511 may be acceptable - it depends on how many other nodeids are registered in the users custom RenderMan_for_Maya.ini file.

/*
<rman id="rslt">
slim 1 extensions cutter {
    extensions fundza cutr {
        template void ColorByCollision {
            userdata {
                rfm_nodeid 1053511
                rfm_classification rendernode/RenderMan/utility
                }

The path on line 56 must also be edited so that the RSLInclude points to the location of the cutrColorByCollision.h script.

    RSLPlugin RfMShadeops
    RSLInclude {FULL_PATH_MUST_BE_EDITED/cutrColorByCollision.h}
    RSLFunction {}
    }

Registration of the node is done in the users custom RenderMan_for_Maya.ini file. Open the file and enter the following text.

    # 1053511
    LoadExtension rslt "/FULL_PATH_MUST_BE_EDITED/cutrColorByCollision.h"
    RAT::LogMsg INFO "cutrColorByCollision has been loaded"

Using the Node

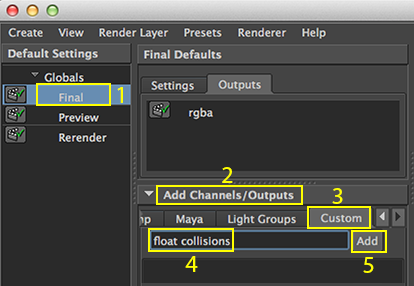
Because the node writes data to a pointcloud it is necessary to assign three attributes to the geometry that will change color when they collide with other objects. Also, a display channel must be declared. For some background information about display channels refer to the RSL: AOVs - Secondary Images tutorial.


Step 1 - Adding the Baking Attributes

Open the RenderMan Controls window and change the View to "Geometric Settings" figure 1.
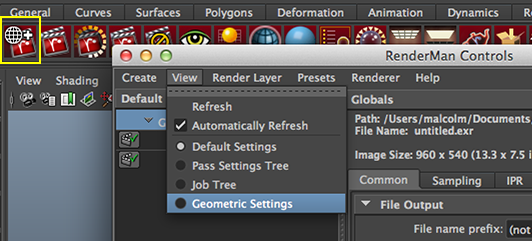


Figure 1


Click on the "Create" button followed by the "Add/Remove Settings" button.
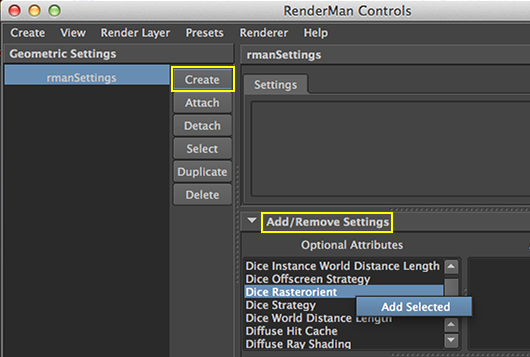


Figure 2


Add these attributes (using a right mouse click),
    Dice Rasterorient
    Cull Backfacing
    Cull Hidden

Then turn them "off".
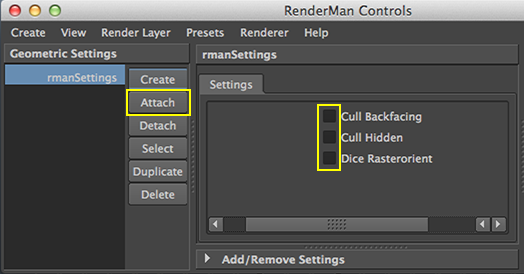


Figure 3


Select the objects in the scene whose surface color will change as result of collisions and click the "Attach" button.


Step 2 - Adding the Display Channel

The custom node, by default, expects to write and read pointcloud data via a variable, of data type "float", named "collisions". By adding a display channel it enables PRMan to "pipe" the values of the "collisions" variable to a pointcloud.

Go to the Final Defaults "Outputs" panel and click the "Add Channels/Outputs" button. Select the "Custom" tab and in the text field enter "float collisions". Click the "Add" button.


Figure 4


Right-mouse click on the float collisions item and choose "Declare Channel" from the popup menu.


Figure 5


Step 3 - Using the Custom Node

Select the objects that should change color when they collide with other surfaces and assign either RMSGPSurface or RMSMatte to them. Click on the "Surface Color" connection icon and select cutrColorByCollision - figure 6.


Figure 6


In the attribute editor assign a path for the ptc file - figure 7.


Figure 7


In Render Settings change the "Frame/Animation ext" to name.#.ext and set the "Start frame" to 0. The node creates a new pointcloud or initializes an existing pointcloud at frame zero.


Figure 8


Render the scene or an animation using the RenderMan menu's Batch Render item or the batchRenderRI command presented in the tutorial,
    RfM: Batch Rendering


How the Node was Developed

Almost 100% of the time spent in developing the techniques used by the node was taken by writing the collision shader presented in the RSL: Color By Collision tutorial. The tutorial provides an overview of the "shader-to-function" developmental process.


Function-to-Node Conversion

The ColorByCollision function given in listing 4 of the "RSL: Color By Collision" tutorial was opened in Cutter. The entire text of the function was selected. After right-mouse clicking the "Export As HyperShade Node" menu was used to generate the node script. Another example of this work-flow is given in the RfM: HyperShade Node Development tutorial.


© 2002- Malcolm Kesson. All rights reserved.