RfM Reyes
HyperShade Node Development


return to main index

Links:
    cutrColorByHeight.h node
    RSL: Color By Height tutorial


Introduction

The tutorial "Cutter:HyperShade Node Scripts" 
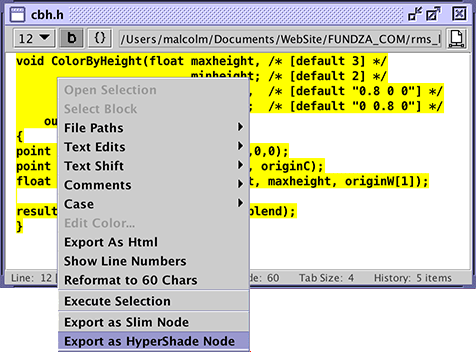
explains Cutter's ability to generate a custom RenderMan hypershade node from a RSL function. This tutorial demonstrates a three step technique that can be applied to node development. As an example of the technique this tutorial implements a node called cutrColorByHeight. The node applies a uniform color to an object based on the height of its origin above the XZ plane. For an overview of the shading technique used by the node the reader should refer to the tutorial, "RSL: Color By Height".

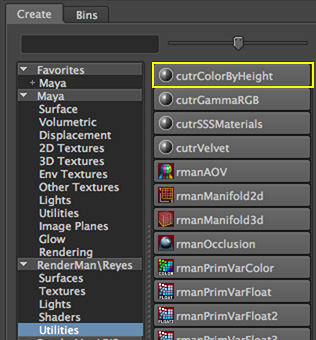
Figure 1 shows 1000 polygons shaded by a cutrColorByHeight node connected to the "Surface Color" parameter of RMSGPSurface. Note that only one instance of RMSGPSurface was used to shade all the polygons.


Figure 1


The user interface of the cutrColorByHeight node is shown below.
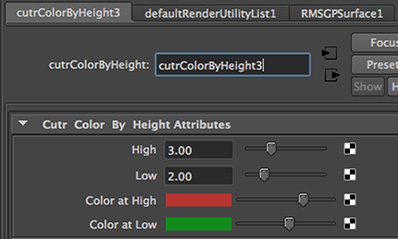


Figure 2


The workflow consists of three steps.


1   Implement a RSL function

    - write a shader that implements a block of RSL code,
    - "wrap" the block of code in a RSL function.

2   Generate a Pixar rslt file

    - use Cutter to convert the RSL function to a custom HyperShade node,
    - edit the default values of the node parameters.

3   Register the node

    - edit the users RenderMan_for_Maya.ini file.

The key element of this workflow is the implementation of a RSL function that will be used by Cutter to generate a (rslt) script that defines a (RenderMan) node for use by Maya's HyperShade shading editor. An experienced shader writer would be able to write a RSL function from scratch. This tutorial assumes the reader has a moderate level of familiarity with RSL and, as such, it is easier to begin by implementing a simple shader that demonstrates the desired functionality. After which it is relatively easy to migrate the code to a RSL function that can subsequently be converted to a node.


Step 1 - Implement a RSL function

The code needed for a RSL function is first implemented by a shader. This is done so that the code can be tested either with a RIB file or directly in Maya. Once it is confirmed the shader creates the desired pattern, or effect, the (relevant) code is copied (migrated) to a RSL function. The function must be implemented in a so-called "header", or .h, file.

Rather than develop code from scratch the shader shown below was adapted from the colorByObjOrigin shader presented in the tutorial RSL: Color By Height. Save the code in a file named ColorByHeight.sl.


Listing 1 (ColorByHeight.sl)


surface
ColorByHeight(float maxheight = 2.5,
                    minheight = 1.25;
            color   maxcolor = color(0,1,0),
                    mincolor = color(1,0,0))
{
// Note: the xyz values of "originC" will not be 0,0,0
// because the point will be (automatically) converted to
// current space aka. the "camera" coordinate system.
point originC = point "object" (0,0,0);
  
// Note: because of the use of the transform() function
// the xyz values of "originW" will not be converted to
// "camera" space but will retain their true "world" 
// space values.
point originW = transform("world", originC);
float blend = smoothstep(minheight, maxheight, originW[1]);
color surfcolor; = mix(mincolor, maxcolor, blend);
  
Oi = Os;
Ci = Oi * surfcolor;
}

Compile the shader to ensure it has no errors. Because the shader was copied from another Fundza tutorial there is no need to test it with a RIB file or with Maya.

Next, the code that performs the coloration, everything except the last two lines of the shader, should be copied to a RSL function - listing 2 (for brevity the comments have been deleted). The "return type" of the function must be void. In many respects a RSL function looks like a RSL shader, however, a major difference is that the inputs of a function, it's arguments, do not have default values.


Listing 2 (patterns.h)


void ColorByHeight(float maxheight,
                         minheight;
                   color maxcolor,
                         mincolor;
    output varying color result)
{
point originC = point "object" (0,0,0);
point originW = transform("world", originC);
float blend = smoothstep(minheight, maxheight, originW[1]);
  
result = mix(mincolor, maxcolor, blend);
}

Because the ColorByHeight function does not directly return a value, the color it computes is assigned to a special input variable declared as,
    output varying color result
As the keywords, "output" and "varying", suggest the variable is not a regular input.
Before using Cutter to convert the function to a Pixar rslt node script it is best to confirm the function works as expected. Listing 3 shows a modified version of the original shader.


Listing 3 (func_test.sl)


#include "patterns.h"
  
surface
func_test(float maxheight = 2.5,
                minheight = 1.25;
        color   maxcolor = color(0,1,0),
                mincolor = color(1,0,0))
{
color surfcolor;
  
// Call the newly implemented function...
ColorByHeight(maxheight, minheight, maxcolor, mincolor, surfcolor);
  
Oi = Os;
Ci = Oi * surfcolor;
}

Compile the func_test shader and import it into HyperShade. Assign the shader to a few vertically distributed objects and confirm they receive varying coloration. For a brief description of how to use a pre-compiled shader with HyperShade refer to the tutorial "RfM 18: Import Reyes Shader"


Step 2 - Generate a Pixar rslt file

Before converting the RSL function to a node, "user interface" hints should be added to the inputs of the function. For example,


void ColorByHeight(float maxheight,  /* [default 10] */
                         minheight;  /* [default 0] */
                   color maxcolor,   /* [default "0.8 0 0"] */
                         mincolor;   /* [default "0 0.8 0"] */
    output varying color result)

The ui-hints embedded within comments will ensure Cutter inserts appropriate default values into the rslt node script. For more information about ui-hints refer to the tutorial, "Cutter: Ui-Hints".

Select the function and use the popup menu (right mouse click) to generate the rslt script that will implement the cutrColorByHeight RenderMan node - figure 3.


Figure 3


Save the script generated by Cutter, for example,
    maya/projects/RfM_hypershade/cutrColorByHeight.h


Step 3 - Register the node

The node is "registered" with RfM via the users custom RenderMan_for_Maya.ini file. Open your RenderMan_for_Maya.ini file. Its location depends on how your environment is configured. If the reader has followed the suggestions in,
    RfM: Customizing
it can be found here,
    maya/projects/RMS_ini/RenderMan_for_Maya.ini

Insert the following lines into the ini document.


# nodeid 1053503
LoadExtension rslt "/Users/$USER/Documents/maya/projects/RfM_hypershade/cutrColorByHeight.h"
RAT::LogMsg INFO "cutrColorByHeight has been loaded"

Make sure the path conforms to the location of your RfM_hypershade director. The final part of this jigsaw is to edit the nodeid number in the cutrColorByHeight.h file. For example,

            userdata {
                rfm_nodeid 1053503
                rfm_classification rendernode/RenderMan/utility
                }

Re-start Maya and, fingers crossed, the new node will appear in the RenderMan/Utilities menu.


Figure 4


© 2002- Malcolm Kesson. All rights reserved.