RfM
RiMel - Rib Archives at Poly Vertices & Curves from Particles


return to main index


Topics

Introduction

This tutorial addresses some issues relating to the instancing of rib archives at, or near, the vertices of a polymesh. It extends several techniques outlined in the tutorial "RfM: Sample Ri Scripts I". The reader should review that tutorial as well as "Mel: Secondary Geometry". It is assumed the reader has established the directory structure outlined in the tutorial "RfM: Customizing".


Example 1 - User Interface + Polymesh + Archives

Unlike the code in the section "Using a Polymesh as a Proxy Surface for Archives" of the tutorial "RfM: Sample Ri Scripts I" this example implements a UI in Maya and enables a texture map to colorize pre-baked ribs, or other geometry, placed at the vertices of a polymesh object.

The code in this example implements the UI shown in figure 1. For an introduction to creating UIs using .rman scripts refer to the tutorial "Cutter: RiMel & Rman Scripting". "Behind" the UI the scripts assign a Pre-Shape MEL attribute to a polymesh. The mel script addArchivesToMeshRI.mel outputs rib statements into the rib stream that is generated by RenderMan for Maya Pro (RfM). Those statements are inserted into the stream immediately before the rib statements that define the polymesh. To run the scripts select a polymesh and enter this command in the script editor,
    addArchivesToMeshUI();
Figure 2 shows two color inputs named file1 and ramp1. A blinn shader has been assigned to a polyplane. Figures 3 and 4 show renders of the polyplane with small spheres assigned to each vertex.


Figure 1


Figure 2


Figure 3
Output using "file1"


Figure 4
Output using "ramp1"


Four scripts (listings 1, 2, 3 and 4) are used by this example. They are,
   addArchivesToMeshUI.rman
        "defines" the UI widgets.
   addArchivesToMeshUI.mel
        "implements" the UI widgets.
   addArchivesToMeshRI.mel
        "querries" the UI widgets and outputs rib.
   polyVertexUtilities.mel
        implements a couple of utility mel procs.
The scripts should be saved in the users maya/projects/RfM_mel directory. The proc that returns the colors of the vertices of a polymesh (getVertexRGB) is based on code written by Kurian O.S - many thanks Sandu.


Listing 1 (addArchivesToMeshUI.rman)


rman "-version 1" {
Declare param {float rad} {
    label "Sphere Rad"
    subtype slider
    range {0.05 1 .01}
    description "Displays a sphere instead of an archive."
    }
Declare param {string archiveName} {
    label "Archive Name"
    description "Name of a pre-baked rib."
    subtype file
    range {*.rib}
    }
Declare param {float archiveScale} {
    label "Archive Scale"
    subtype slider
    range {0.05 1 .01}
    description "Scaling factor for the pre-baked rib."
    }    
Declare param {int useArchive} {
    label "Use Archive"
    subtype selector
    range {
        "ignore"  0
        "use"  1
        }
    description "\"Ignore\" ensures that spheres are instanced."
    }
Declare param {string colorInput} {
    label "Color Input"
    description "For example \"file1\"."
    }
}


Listing 2 (addArchivesToMeshUI.mel)


global proc addArchivesToMeshUI() 
{
string $selected[] = `ls -sl`;
int $i, $j;
  
for( $i=0; $i < size($selected); $i++ ) 
    {
    string $shp[] = `listRelatives -shapes $selected[$i]`;
    string $shapeName = $shp[0];
    string $attr = `rmanGetAttrName "preShapeScript"`;
  
    // "Connect" to the mel script that calls 
    // Pixar's custom Ri mel procedures.
    rmanAddAttr $shapeName $attr "addArchivesToMeshRI";
        
    $attr = `rmanGetAttrName "rad"`;
    rmanAddAttr $shapeName $attr "0.05";
  
    $attr = `rmanGetAttrName "archiveName"`;
    rmanAddAttr $shapeName $attr "RIB_Archive/name.rib";
  
    $attr = `rmanGetAttrName "archiveScale"`;
    rmanAddAttr $shapeName $attr "1.0";
  
    $attr = `rmanGetAttrName "useArchive"`;
    rmanAddAttr $shapeName $attr "0";
    
    $attr = `rmanGetAttrName "colorInput"`;
    rmanAddAttr $shapeName $attr "";
    }
}


Listing 3 (addArchivesToMeshRI.mel)


source "polyVertexUtilities.mel";
  
//----------------------------------------------------
// addArchivesToMeshRI.mel
//----------------------------------------------------
global proc addArchivesToMeshRI()
{
// Get the names of the shape and transform nodes
string $shapeNode = `rman ctxGetObject`;
string $parents[] = `listRelatives -parent $shapeNode`;
string $tformNode = $parents[0];
  
// Get the values from the UI widgets
$attr = `rmanGetAttrName "rad"`;
float $radius = `getAttr($shapeNode + "." + $attr)`;
  
$attr = `rmanGetAttrName "archiveName"`;
string $archiveName = `getAttr($shapeNode + "." + $attr)`;
  
$attr = `rmanGetAttrName "archiveScale"`;
float $archiveScale = `getAttr($shapeNode + "." + $attr)`;
  
$attr = `rmanGetAttrName "useArchive"`;
int $useArchive = `getAttr($shapeNode + "." + $attr)`;
  
$attr = `rmanGetAttrName "colorInput"`;
string $colorInput = `getAttr($shapeNode + "." + $attr)`;
  
// Write the extra rib statements
vector $verts[], $rgbs[];
getVertexXYZ($tformNode, $verts);
getVertexRGB($tformNode, $rgbs, $colorInput);
  
for ($n = 0; $n < size($verts); $n++) {
    vector $vert = $verts[$n];
    vector $rgb = $rgbs[$n];
    RiTransformBegin();
        RiTranslate($vert.x, $vert.y, $vert.z);
        RiColor($rgb.x, $rgb.y, $rgb.z);
        if($useArchive) {
            RiScale($archiveScale,$archiveScale,$archiveScale);
            RiReadArchive($archiveName);
            }
        else
            RiSphere($radius, -$radius, $radius, 360);
    RiTransformEnd();
    }
RiAttribute("visibility", "int camera", 0);
}


Listing 4 (polyVertexUtilities.mel)


/----------------------------------------------------
// getVertexXYZ
//----------------------------------------------------
// This returns the xyz positions of the vertices of a mesh
global proc getVertexXYZ(string $tnode, vector $xyzs[])
{
int $count = size($xyzs);
int $num[] = `polyEvaluate -v $tnode`;
string $shp[] = `listRelatives -shapes $tnode`;
string $shape = $shp[0];
float $pos[];
  
for ($n = 0; $n < $num[0]; $n++) {
    $vert = $shape + ".vtx[" + $n + "]";
    $pos = `pointPosition -local $vert`;
    $xyzs[$count] = <<$pos[0], $pos[1], $pos[2]>>;
    $count++;
    }
}
  
//----------------------------------------------------
// getVertexRGB
//----------------------------------------------------
// This returns the rgb values of the vertices of a mesh
global proc getVertexRGB (string $tnode, vector $rgbs[], string $colorInput)
{
int     $count = size($rgbs);
int     $num[] = `polyEvaluate -v $tnode`;
string     $shp[] = `listRelatives -shapes $tnode`;
string     $shape = $shp[0];
  
// We step over the list of "maps", get each uv and
// then use colorAtPoint to build a list of rgb values
for ($n = 0; $n < $num[0]; $n++) {
    $vert = $shape + ".vtx[" + $n + "]";
    $maps = `polyListComponentConversion -fv -toUV $vert`;
    $uv = `polyEditUV -q $maps[0]`;
    
    float  $color[];
    if(size($colorInput) > 0)
        $color = `colorAtPoint -o RGB -u $uv[0] -v $uv[1] $colorInput`;
    else
        $color[0] = $color[1] = $color[2] = 1.0;
        
    $rgbs[$count] = <<$color[0], $color[1], $color[2]>>;
    $count++;
    }
}


Example 2 - User Interface for Particles Generating Curve Archives

This example demonstrates one way of recording, as a pre-baked rib file, the trajectories of a particle system as series of RenderMan curves. Some of the code presented here is based on the mel and python code given in the tutorial "Mel: Secondary Geometry". Listings 5 and 6 implement the UI shown below. The UI is instanced as a Post-Transform MEL attribute that can be assigned to a particles of an emitter.


Figure 5


Because particle systems can interact with objects and forces they can be used to define complex paths. Uses of pre-baked curves include firework displays, vines that appear to have grown around objects and pseudo volumeric lights.


Figure 6
Pre-baked curves


Figure 7
Shaded using sparky (listing 9)


The "back-end" RI script, bakeParticleCurvesRI.mel, (listing 7) delegates the work of recording particle positions and writing an archive rib file to the python script shown in listing 8. The first three scripts should be saved in the users maya/projects/RfM_mel directory. The python script should be saved in the users maya/projects/RfM_python directory.


Listing 5 (bakeParticleCurves.rman)


#
# bakeParticleCurves.rman
#
rman "-version 1" {
Declare param {float bpc_width} {
    label "Curve Width"
    subtype slider
    range {0.001 0.5 .001}
    description "Constant width of each curve."
    }
Declare param {int bpc_startFrame} {
    label "Start at Baking at Frame"
    subtype slider
    range {1 1000 1}
    description "Begin writing ribs."
    }
Declare param {int bpc_endFrame} {
    label "End Baking at Frame"
    subtype slider
    range {2 1000 1}
    description "End writing ribs."
    }
Declare param {int bpc_useGlobals} {
    label "Use Render Globals"
    description "Ignore start/end frame."
    subtype switch
    }
Declare param {int bpc_type} {
    label "Curve Type"
    subtype selector
    range {
        "Linear" 0
        "Cubic"  1
        }
    }
}


Listing 6 (bakeParticleCurvesUI.mel)


// 
// bakeParticleCurvesUI.mel
//
global proc bakeParticleCurvesUI() 
{
string     $selected[] = `ls -sl`;
int     $i;
  
for( $i=0; $i < size($selected); $i++ ) 
    {
    string $attr = `rmanGetAttrName "postTransformScript"`;
    string $transformName = $selected[$i];
    
    // "Connect" to the mel script that calls 
    // Pixar's custom Ri mel procedures.
    rmanAddAttr $transformName $attr "bakeParticleCurvesRI";
    
    $attr = `rmanGetAttrName "bpc_width"`;
    rmanAddAttr $transformName $attr "0.01";
  
    $attr = `rmanGetAttrName "bpc_startFrame"`;
    rmanAddAttr $transformName $attr "1";
  
    $attr = `rmanGetAttrName "bpc_endFrame"`;
    rmanAddAttr $transformName $attr "50";
  
    $attr = `rmanGetAttrName "bpc_useGlobals"`;
    rmanAddAttr $transformName $attr "1";
  
    $attr = `rmanGetAttrName "bpc_type"`;
    rmanAddAttr $transformName $attr "1";
    }
}


Listing 7 (bakeParticleCurvesRI.mel)


// 
// bakeParticleCurvesRI.mel
//
global proc bakeParticleCurvesRI()
{
// Get the name of the transform node
string $tnode = `rman ctxGetObject`;
  
string $attr;
$attr = `rmanGetAttrName "bpc_width"`;
float $width = `getAttr($tnode + "." + $attr)`;
  
$attr = `rmanGetAttrName "bpc_startFrame"`;
int $start = `getAttr($tnode + "." + $attr)`;
  
$attr = `rmanGetAttrName "bpc_endFrame"`;
int $end = `getAttr($tnode + "." + $attr)`;
  
$attr = `rmanGetAttrName "bpc_useGlobals"`;
int $useGlobals = `getAttr($tnode + "." + $attr)`;
  
$attr = `rmanGetAttrName "bpc_type"`;
int $type = `getAttr($tnode + "." + $attr)`;
  
int $globalStart = getAttr("defaultRenderGlobals.startFrame");
int $globalEnd = getAttr("defaultRenderGlobals.endFrame");
  
// We're using the frame slider values...
if($useGlobals == 0) {
    // Check we are not outside the frame range
    $start = ($start < $globalStart) ? $globalStart : $start;
    $end = ($end > $globalEnd) ? $globalEnd : $end;
    }
else
    {
    $start = $globalStart;
    $end = $globalEnd;
    }
// The heavy lifting is done by a python script
python("import bakeParticleCurves as bpc");
$tnode = "\"" + $tnode + "\"";
$typeStr = ($type == 1) ? "\"cubic\"" : "\"linear\"";
$cmd = "bpc.bakeParticleCurves(" + 
        $tnode + "," + $start + "," + $end + "," +
        $width + "," + $typeStr + ")";
python($cmd);
}


Listing 8 (bakeParticleCurves.py)


import maya.cmds as mc
  
class Cache:
    def __init__(self, width):
        self.data = []
        self.width = width
    def reset(self, width):
        self.data = []
        self.width = width
    def add(self, index, pos):
        if len(self.data) > index:
            xyz = pos[0:3]
            self.data[index].append(xyz[0])
            self.data[index].append(xyz[1])
            self.data[index].append(xyz[2])
        else:
            self.data.append(pos[0:3])
    def get(self, index):
        return self.data[index]
    def getFirstXYZ(self, index):
        x = self.data[index][0]
        y = self.data[index][1]
        z = self.data[index][2]
        return x,y,z
    def getLastXYZ(self, index):
        n = len(self.data[index])
        x = self.data[index][n - 3]
        y = self.data[index][n - 2]
        z = self.data[index][n - 1]
        return x,y,z
    def length(self):
        return len(self.data)
    def update(self, tnode):
        pnum = mc.particle(tnode, q = True, count = True)
        for n in range(pnum):
            pname = tnode + ".pt[%s]" % n
            pos = mc.getParticleAttr(pname,at = 'position')
            self.add(n, pos) 
cacheDB = { } 
#-----------------------------------------
def getSceneName():
    name = mc.file(q = True, sceneName = True, shortName = True)
    if len(name) == 0:
        name = "untitled"
    else:
        name = name[:len(name) - 3]
    return name
#-----------------------------------------
def getDataDir():
    projPath = mc.workspace(q = True, rootDirectory = True)
    return projPath + "data"
#-----------------------------------------        
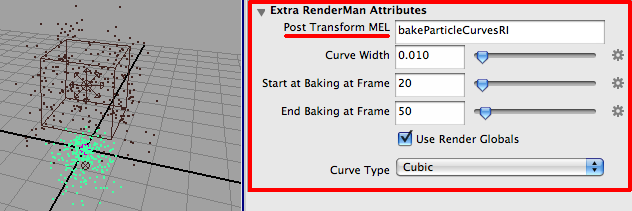
def bakeParticleCurves(tnode, start, end, width, curveType):
    global cacheDB
    if cacheDB.has_key(tnode):
        cache = cacheDB.get(tnode)
    else:
        cache = Cache(width)
        cacheDB[tnode] = cache
    currFrame = mc.currentTime(q = True)
    if currFrame == 1:
        cache.reset(width)
    if currFrame >= start and currFrame <= end:
        cache.update(tnode)
    if currFrame == end:
        pathToCurves = getDataDir() + "/" + getSceneName() + "." + tnode + ".rib";
        fileid = open(pathToCurves, 'w')
        fileid.write('AttributeBegin\n')
        fileid.write('Attribute "dice" "hair" [1]\n')
        fileid.write('Attribute "stochastic" "int sigma" [1]\n')
        fileid.write('Basis "catmull-rom" 1 "catmull-rom" 1\n')
        for n in range(cache.length()):
            xyz = cache.get(n)
            if curveType == 'cubic' and len(xyz)/3 >= 4:
                rib = 'Curves "cubic" [%d] "nonperiodic" "P" [\n' % (len(xyz)/3)
                fileid.write(rib)
                for i in range(len(xyz)):
                    fileid.write("%1.3f " % (xyz[i]))
                rib = '\n] "constantwidth" [%1.4f] \n' % width
                fileid.write(rib)
            elif curveType == 'linear' and len(xyz)/3 >= 2:
                rib = 'Curves "linear" [2] "nonperiodic" "P" ['
                rib = rib + '%1.3f %1.3f %1.3f ' % cache.getFirstXYZ(n)
                rib = rib + '%1.3f %1.3f %1.3f]' % cache.getLastXYZ(n)
                rib = rib + ' "constantwidth" [%1.4f]\n' % width
                fileid.write(rib)
        fileid.write('AttributeEnd\n')
        fileid.close()


Using the Scripts

After saving the scripts in the appropriate directories a new Maya session can begin.
1     Set the project directory.
2     Create an emitter.
3     Select one or more of its particles and enter the following command in a Mel tab of the Script Editor.
    bakeParticleCurvesUI();
4     Set the start and end frames in the Render Settings window.
5     To record the trajectories of the particle system enter the following Mel command.
    rman genrib;
The archive file containing the specification of the curves will be written to the projects data directory. For example, the Maya scene shown in figure 5 generated two archive rib files,

    particlesAsCurves.particle1.rib
    particlesAsCurves.particle1.rib

Listing 9 (sparky.sl)


surface
sparky(float    brightness = 1,
                age = 0,
                rearblur = 0.05,
                frontblur = 0.0;
        color   start = color(1,1,1),
                end = color(0.482,0.776,0.996))
{
color    surfcolor = mix(start, end, age);
  
Oi = Os * smoothstep(age - rearblur, age, v) *
          (1 - smoothstep(age, age + frontblur, v));
Ci = Oi * Cs * surfcolor * brightness;
}


© 2002- Malcolm Kesson. All rights reserved.