RSL
Ambient Occlusion


return to main index


Introduction

Ambient occlusion is a technique that appeals to many CGI enthusiasts. Scenes rendered using this technique are often visually appealing. Typically, such scenes are rendered using the ray tracing features of a renderer. Although it is often assumed that ray tracing produces photo-realistic images, in the case of ambient occlusion such an assumption is wrong. The shading effect achieved with ambient occlusion is not dependent on the light sources in a scene. Infact, occlusion ordinarily does not even require a scene to have any light sources! Ambient occlusion has more in common with techniques used by illustrators than photo-realists.

Rather than consider ambient lighting to exist uniformally throughout a scene, techniques based on occlusion determine the (ambient) brightness of each part of a surface to be proportional to the extent to which the surface has "its outward view of its environment" blocked ie. occluded, by other surfaces in the scene. For example, the underside of a ball that has been placed in the middle of the floor of a room is less exposed to its local environment than, say, the top of the ball. As a consequence the top of the ball will be "proportionally" brighter than the rest of the sphere.

This tutorial looks at the code for some introductory surface shaders that incorporate ambient occlusion.


Basic Code

The basic code for listing 1 was taken from Pixar's Application Note #35 "Ambient Occlusion, Image Based Illumination, and Global Illumination". It can be found at

    docs-X.X\prman_technical_rendering\AppNotes\globillum.html

within the Pixar directory. In the code for their first sample occlusion surface shader they refer to a function called shadingnormal(). This not a standard RSL function. It is implemented in a header file located at,

    PIXAR_PATH/lib/shaders/normals.h

The sample code on this page does not rely on their header file but, instead, uses the facenormal() function in a simplistic way.


Listing 1


surface occlude1(float  samples = 32)
{
normal  n = normalize(N),
        nf = faceforward(n, I);
float   hits = 0;
 
gather("illuminance", P, nf, PI/2, samples, "distribution","cosine")
    {
    hits += 1;
    }
/* find the average occlusion factor */
float average = hits / samples;
  
Ci = (1 - average) * Cs;
Oi = 1;
}

The gather() function shoots a number of rays, defined by samples, out from the micro-polygon currently being shaded. In effect the rays go out in a hemi-spherical "umbrella" set by the angle PI/2 radians symmetrically about the surface normal ie.180 degrees. For each of the sample rays that hit a surface the hits counter is updated by 1. Put simplistically, more hits mean there is more geometry hiding the "umbrella".

In particular, note that Ci - the apparent surface color - is set to the average of the numbers of hit recorded by gather(). Since the average varies between 0 and 1 the shader is assigning a grayscale value to each part of the surface to which it is "attached". This surface shader does not take into account any direct lighting effects. Notice the rib file, listing 2, used to test the shader does not include any light sources!

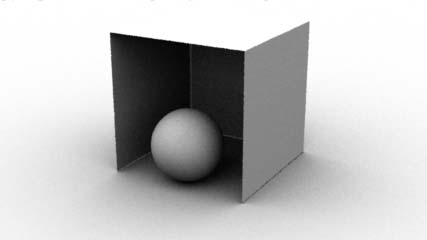
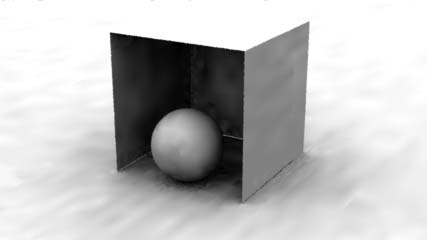
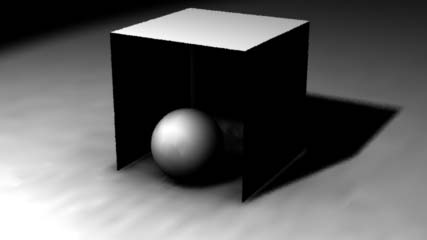
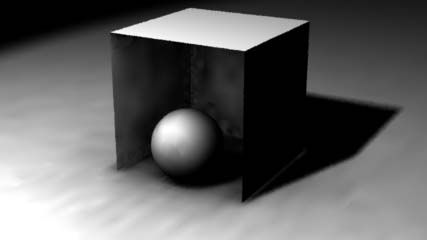
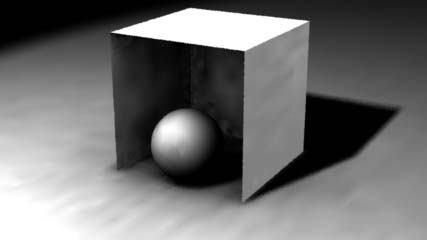
Figure 1 shows the effect of the occlude1 shader on a simple scene consisting of three objects.


Figure 1


Listing 2


Option "trace" "int maxdepth" [4]
Display "occlude_test" "framebuffer" "rgb"
Format 427 240 1
Projection "perspective" "fov" 20
ShadingRate 1
 
Translate  0 -0.3 5
Rotate -20 1 0 0
Rotate  30 0 1 0
Scale 1 1 -1
 
WorldBegin
    Attribute "visibility" "trace" [1]
    Attribute "visibility" "transmission" "opaque"
    Attribute "cull" "hidden" 0
    Attribute "cull" "backfacing" 0
    # uncomment the next line when using 3delight
    # Declare "samples" "float" 
    TransformBegin
        Attribute "identifier" "name" ["ball"]
        Surface "occlude1" "samples" 32
        Translate 0 0.25 0.35
        Sphere 0.25 -0.25 0.25 360 
    TransformEnd
    TransformBegin
        Attribute "identifier" "name" ["box1"]
        Translate 0 0.5 0
        Surface "occlude1" "samples" 32
        PointsPolygons [4 4 4 4]
            [0 1 2 3   0 4 5 1   2 1 5 6   0 3 7 4]
         "P" [-0.5 0.5 -0.5   0.5 0.5 -0.5   
               0.5 0.5 0.5   -0.5 0.5 0.5
              -0.5 -0.5 -0.5   0.5 -0.5 -0.5   
               0.5 -0.5 0.5   -0.5 -0.5 0.5]
    TransformEnd
    TransformBegin
        Attribute "identifier" "name" ["floor"]
        Scale 40 1 40
        Surface "occlude1" "samples" 32
        Polygon "P" [-0.5 0 -0.5   0.5 0 -0.5  
                      0.5 0 0.5  -0.5 0 0.5]
    TransformEnd
WorldEnd


Performance

Rendering the rib file with a higher sampling rate improves the image quality (figure 2) but at a considerable cost in rendering time.


Figure 2 - "samples" 128


Listing 3 gives the code for an improved version of occlusion shader. It uses a shading language function called occlusion().


Listing 3


surface occlude2(float  samples = 32, 
                        maxdist = 100000)
{
normal  n = normalize(N),
        nf = faceforward(n, I);
float   occ = occlusion(P, nf, samples, "maxdist", maxdist);
 
Oi = Os;
Ci = (1 - occ) * Cs * Oi;
}

Although the occlusion() function improves rendering performance it adds a blochy appearance to each surface. This can be controlled by adding a statement to control the quality of the occlusion shading applied to ALL objects in the scene or the statement can be assigned to objects individually.

For example, to improve the appearance of the "floor" in figure 3,


Figure 3 - "samples" 32


an irradiance Attribute can be added to the transform block of the poly-plane - listing 4.


Listing 1


TransformBegin
    Attribute "irradiance" "maxerror" [0]
    Attribute "identifier" "name" ["floor"]
    Scale 40 1 40
    Surface "occlude2" "samples" 32
    Polygon .... data omitted ....
TransformEnd

The value hilited in red is the value that controls occlusion quality. Smaller values give better results (figure 4), but again, at the cost of rendering speed.


Figure 4 - samples" 64 "maxerror" [0]


Direct Lighting

Using either the occlude1 or the occlude2 shader prevents shadows being rendered because neither shader takes direct lighting into account. Figure 5 shows the effect of a shadow casting spotlight when the occlude3 shader (listing 4) is used.


Figure 5 - all surfaces respond to diffuse lighting


Listing 4


surface occlude3(float  samples = 32, 
                        maxdist = 100000,
                        Kd = 1)
{
normal  n = normalize(N),
        nf = faceforward(n, I);
float   occ = occlusion(P, nf, samples, "maxdist", maxdist);
 
Oi = Cs;
Ci = (1 - occ) * Cs * Oi * Kd * diffuse(nf);
}

The apparent color of the surface (Ci) takes into account the value received from the diffuse() function. Refer to "What is a Surface Shader" for more information about diffuse().

Traditionally, the shadowspot lightsource shader could produce a shadow if the name of a pre-rendered depth map texture had been given as the value of the parameter "shadowname". As of release 11 of prman the word raytrace ensures that the shadowspot, shadowpoint and shadowdistant shaders use ray traced shadows.

    LightSource "shadowspot" 1 "intensity" 55 
                "from" [-1 5 5] "to" [0 0 0]
                "shadowname" ["raytrace"]
                "samples" 64.0
                "width" 8

Figure 6 shows the effect of using the occlude2 shader on the box while using the new occlude3 shader on the ball and floor.


Figure 6 - ball and floor shadows only


The following code snippet shows how a shader can test if it is currently shading the interior or exterior face of a surface.

    /* we're shading the outside of a surface - ignore diffuse() */
    if(n == nf)
         Ci = (1 - occ) * Cs * Oi;
    else /* we're shading the inside */
         Ci = (1 - occ) * Cs * Oi * Kd * diffuse(nf);

In figure 7 we see the effect of switching diffuse() "off" on outward facing surfaces.


Figure 7


© 2002- Malcolm Kesson. All rights reserved.