Workflow
1 Select a polymesh object that you wish to be rendered as a blobby.
2 Open the script editor (MEL tab) and execute the following commands,
      addFloatPrimVar("blobby", 1);

			       addFloatPrimVar("blob_min", 0.1);

			       addFloatPrimVar("blob_max", 0.2);
The first addFloatPrimVar tags the polymesh for conversion to a Blobby.
The second and third addFloatPrimVar sets minimum and maximum
sizes that will be used by the rif when it randomly scales each blob.
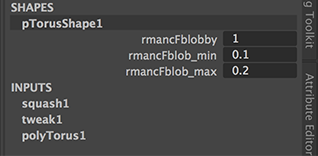
3 To confirm the additional channels have been added go to the Channels tab.

Figure 3
Note the names have each has automatically been given the prefix rmamcF. Their prefixes will ensure
the value of each channel will become primvars that can be
read by the rif.
4 Execute the following python commands in the script editor (Python tab),
import batch

rifs = ['rif_it','rif_mesh2blobby.Rif(0.3)']
batch.render(1,1, rifs)
The value of 0.3 will be used by the rif if it cannot find the primvar values of blob_min and blob_max, in which case the blobs will be of a uniform size.